The ultimate guide to taking great WoW screenshots
World of Warcraft is a beautiful game, with lush environments, expressive character models, and breathtaking scenery. Capturing in-game memories as WoW screenshots requires only a simple button press, but with a little knowledge and practice, you can go from basic “point-and-shoot” screenshots to bold, visually-captivating pieces of digital art. And Blizzard Watch is here to help you get started!
Screenshots 101: File Formats
By default, World of Warcraft saves screenshots as .jpeg files, but can also use the .tga (TARGA) format. Jpegs are compressed, meaning slightly lower image quality but also smaller file sizes, while TARGA images are lossless (uncompressed), which means perfect quality, but larger file sizes. Additionally, .tga images simply do not work with many image viewing programs and websites, such as most blogging platforms and Twitter (including WoW‘s in-game Twitter integration).
In my experience, the quality difference between a .tga screenshot and a maximum-quality .jpeg is usually quite minor, if it’s noticeable at all. I use .jpeg screenshots — I found that having to open and re-save every .tga screenshot first before they would work online (or even if I merely want to browse them on my own computer!) to be exceptionally annoying. And when you take as many screenshots as I do (8,000 so far in Warlords of Draenor alone), the difference in file size really adds up.
To set your screenshots to maximum-quality .jpeg format, enter the following while in-game:
/console screenshotFormat jpg
/console screenshotQuality 10
To use .tga format:
/console screenshotFormat tga
These are account-wide, permanent setting changes, so you only have to enter them once, on any character. Of course, you can also switch formats whenever you want — sometimes I toggle .tga mode on when I’m taking particularly important screenshots.
(Note: Mac users can use Screen Capture (⇧⌘3) for a lossless .png screenshot. PNG images are like .tga, except they’re usually smaller in file size, and work in most image programs and web services! Screen Capture is a Mac function, not a World of Warcraft one, so the captured image gets saved to your desktop.)
The Rule of Thirds
One of the most fundamental guidelines in visual design is the Rule of Thirds. Essentially, the Rule of Thirds states that art (such as paintings, photography, or in our case, screenshots) is more visually pleasing when important elements are placed on equally-spaced vertical and horizontal lines, or on the intersection of these lines. Research has shown that our eyes naturally gravitate to these intersection points, rather than the center of an image.
Another reason to avoid directly centering strong vertical subjects (such as people, trees, or towers) or horizontal subjects (such as mountains, ground lines, or bodies of water) is that doing so tends to split the screenshot awkwardly in half, leaving viewers unsure where they should be looking. Positioning these elements off-center results in scenes that feel more balanced and natural. You can do this when taking the screenshot, or later, with an image editing program.
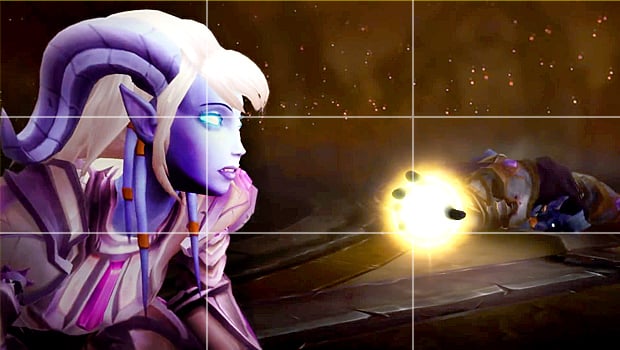
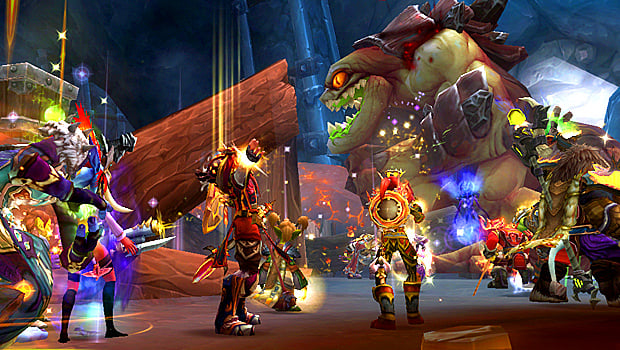
Even when a screenshot does have a central focus, you can still use the Rule of Thirds to align pieces of the overall picture. In the following screenshot, Gul’dan himself is centered in the shot, but each of his hands are following one of the horizontal lines, and more importantly, his eyes and gaze are on the upper line.
It’s important to remember that the Rule of Thirds is not an ironclad requirement, but merely a general guideline! Breaking it can often lead to visually-striking, interesting shots. Furthermore, sometimes you don’t want a shot to look natural — there’s definitely something to be said for the structured, organized look of symmetry, if that’s what you’re going for. And sometimes you actually do want a character to look a bit out-of-place, like they’re the center of attention.
Leading lines
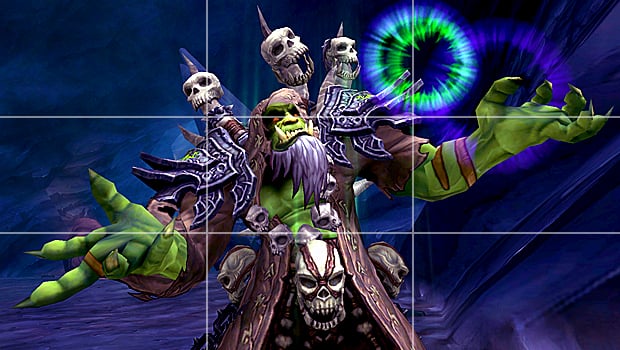
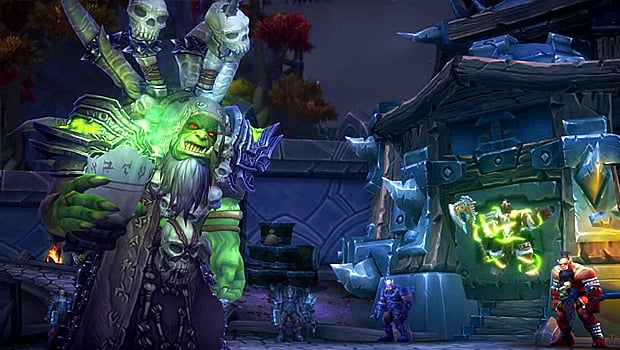
Lines in a screenshot can help lead a viewer’s gaze toward what it is you want them to see. Look at all the lines in the above image — the spell effects, the growths on Brackenspore’s body, the huge mushrooms way off in the distance — they’re all functioning as arrows, directing your eyes toward the central focus. And remember what I just said, about positioning a character in the middle of a shot to be the center of attention?
Leading lines don’t have to be literal straight lines, either! A curving path, a canopy of branches overhead that are drooping down — anything that helps viewers travel from one part of your screenshot to another.
For that matter, sometimes leading lines aren’t even visible. Where a character is looking can also serve as an effective leading line, and if multiple characters are all looking in the same direction, this becomes even more effective. Viewers naturally want to follow such sight lines and discover just what everyone seems to be finding so interesting.
Another trick is to use leading lines that converge at a fixed point in the distance to create a sense of vast, infinite space, like a highway stretching off into the horizon. These lines work well with centered, symmetrical framing.

Say cheese!
Sometimes a scene is beautiful on its own, but sometimes it needs a bit of extra help. Fortunately, we have plenty of tools that can liven up an otherwise-dull screenshot!
- Emotes: Using /emotes can add a lot of flavor to a screenshot. Try some of the following: /beg, /bow, /bye, /charge, /cheer, /clap, /cry, /dance, /drink, /flee, /flex, /gasp, /kiss, /kneel, /laugh, /no, /roar, /salute, /shrug, /talk, /train, /yes.
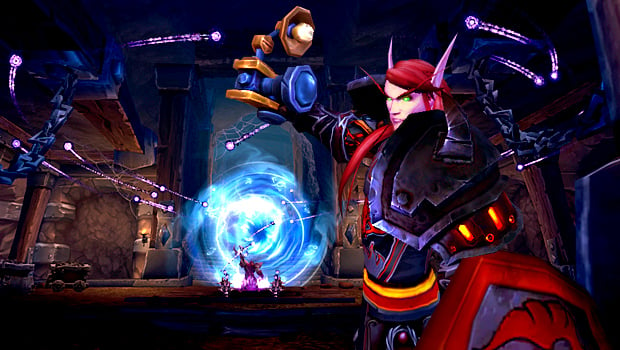
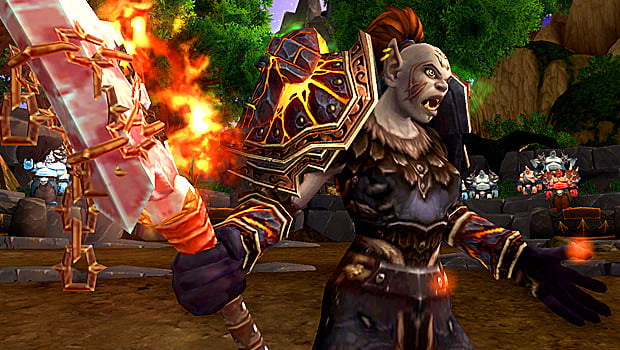
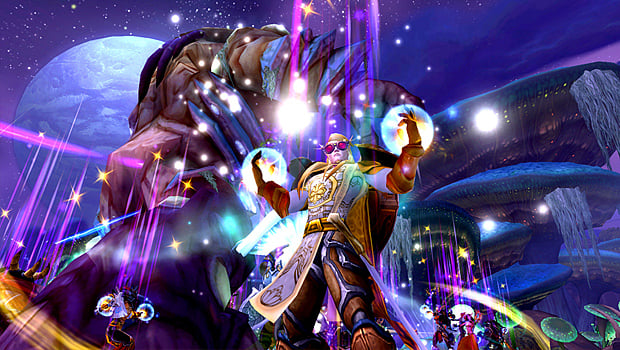
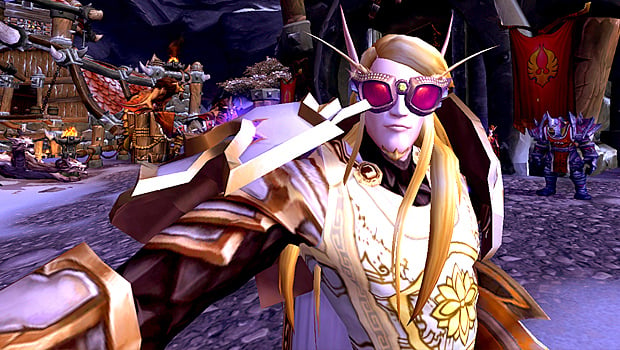
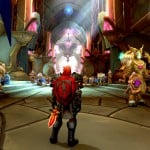
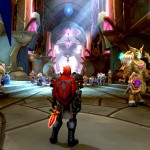
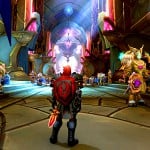
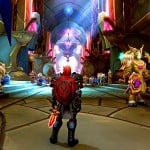
- Abilities: Use spells and abilities to to put your character in dramatic poses (great for action shots!) or to add some nice, shiny spell effects to your screenshot. Not a spellcaster? Try Mass Resurrection (pictured above) or your Hearthstone!You can also right-click a distant enemy or critter to try to “attack” it and put yourself into your combat stance. Just be sure you’re actually out of range, though — Hunters especially, but some enemies have surprisingly large hit boxes!
- Idle animations: The simple head turn or bored look around that occurs after a few seconds of inactivity can be surprisingly effective at giving a character personality! These mannerisms can also make it seem like a character is part of the scene around them, instead of merely posing in front of it.
- Props: The Toy Box has given us a wonderful selection of costumes, effects and props we can use in screenshots. Alter your appearance with Ai-Li’s Skymirror or the Iron Buccaneer’s Hat, start an impromptu dance party with Piccolo of the Flaming Fire, set down a Romantic Picnic Basket — the possibilities are endless. And don’t forget non-Toy Box props, like Elune Stone or Reflecting Prism!
Addon: PerfectScreenshot
I wouldn’t recommend an addon in a screenshot tutorial unless I swore by it, and PerfectScreenshot is absolutely a vital part of my screenshot process. The original creator stopped updating it years ago, but I rely on this addon so heavily I managed to convince a guildmate to pick it up and take it over last year.
You can disable the in-game interface by pressing Alt-Z, but if you have names enabled, Alt-Z doesn’t hide them! PerfectScreenshot gives you not one, but three Jormungars additional methods that make snapping screenshots easier and faster. It’s like Alt-Z Extreme.
Shift-PrintScreen hides the interface and names, takes a screenshot, and then re-enables both, all in a single button press, similar to the S.E.L.F.I.E. Camera’s Take Selfie button. Ctrl-PrintScreen does the same, except it leaves names showing. And Alt-PrintScreen will temporarily disable floating combat text and capture an interface-free screenshot while in combat.
Normally, healing and damage numbers remain visible even after pressing Alt-Z, so being able to capture combat action shots without having to open your options and disable floating combat text is a fantastic luxury. The combat screenshot does have a delay of a few seconds, but this is necessary pause to allow any existing combat text to disappear before the screenshot is captured.
Finally, as many of us have discovered, using the S.E.L.F.I.E. Camera rapidly leaves “Screen Captured” text in the middle of your Selfie. But use PerfectScreenshot instead, and you can take Selfies as as fast as you want — that annoying message will never plague you again.
Digital Editing
Once you’ve got your screenshots, it’s time to add some digital polish! A bit of processing can turn a good screenshot into a great one. Adobe Photoshop is the industry standard for graphic editing, but GIMP (GNU Image Manipulation Program) is a free, fully-capable alternative.
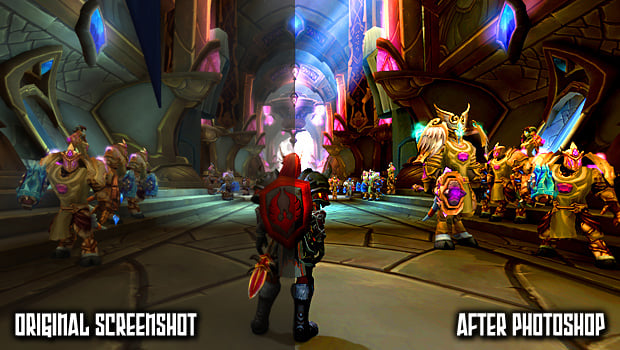
Here’s a step-by-step guide to my editing process. There’s no limit to what you can do when tinkering with your shots, but I’m going to keep it simple here and just cover the basics. Everyone’s personal tastes will vary, of course, so feel free to do more or less editing as you see fit! Ease up on the contrast, add some text, bump up the colors…whatever you feel like!
-
- 1. Import your screenshot into Photoshop, GIMP, or another image editing program.
-
- 2. Crop/Scale to focus on your subject, and eliminate unwanted elements.
-
- 3. Adjust Levels until lighting and contrasts look good! It’s okay if things look a bit washed out.
-
- 4. Adjust Color Balance to taste. I reduced the amount of yellow and increased the blue.
-

- 5. Saturation! Here’s where you can really make the colors bright and vibrant.
-
- 6. Sharpen. You can use the Sharpen or Unsharp Mask filters, or just the Sharpen Tool.
-
- 7. Use the Dodge/Burn Tool to lighten or darken) areas that need it. You’re done!
What are some of your favorite ways to take screenshots? Got any clever tricks, favorite emotes or special locations you like to use? Tell us about them in the comments!
Please consider supporting our Patreon!
Join the Discussion
Blizzard Watch is a safe space for all readers. By leaving comments on this site you agree to follow our commenting and community guidelines.