Lightsworn: Dungeon tanking tips, talents, and treasure
You can solo as Protection all day long (and it’s a blast), but you aren’t tanking until you get into group content. Legion has some fantastic dungeons and they should stay relevant much longer than any previous expansion with Mythic+ slated to be a viable alternative to raids. There’s some debate among the theorycrafters about which class is the ‘best’ Mythic tank, but the bottom line is all tanks are viable for Mythic+ progression. That said, no other tank comes close to being as much fun to play as the Tankadin. (Editor’s note: This statement may represent some minor preexisting bias on the part of the author.)
This is my default dungeon talent build, and I will adjust it for certain dungeons and bosses as I’ll discuss below. Please note that the names of the bosses may provide some minor spoilers for the leveling zones stories.
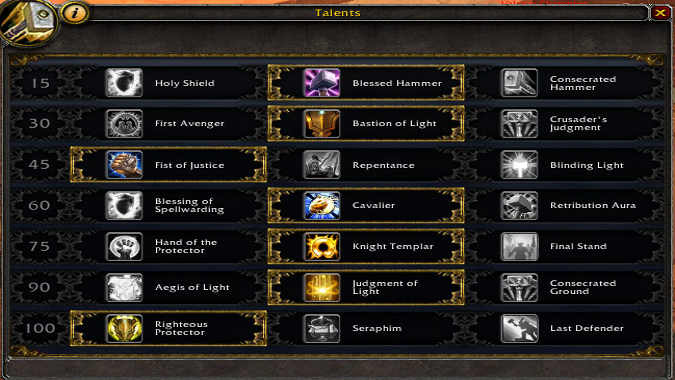
The Build
Level 15 – Blessed Hammer
Blessed Hammer is better for trash than bosses, but there’s more trash than bosses in most dungeons. Even if you have a Tome of Tranquil Mind, most groups aren’t stopping to let you swap talents at each boss. Every boss will melee you (some more than others) and the small damage reduction on their next auto attack can help. This is one talent that I change often as many of Legion‘s boss fights are movement heavy which favors taking Consecrated Hammer. Eye of Azshara and Vault of the Wardens’ fights are two places where Consecrated Hammer shines.
Level 30 – Bastion of Light
Bastion of Light increases the uptime of the Shield of the Righteous Active Mitigation damage reduction. This might give the healer time to get back into range or stabilize me, or enough time for Light of the Protector to come off cooldown. There are several fights where you need to cover a window of time with Active Mitigation like the Darkstrikes attack from Tirathon Saltheril in the Vault of the Wardens.
Level 45 – Fist of Justice
I’d love to take Blinding Light’s AOE CC but the disorient will last about half a millisecond in a dungeon group. Repentance is a decent CC, and we may see some CC at the beginning of Legion, but that will be over in short order. Fist of Justice is the only choice left. At least stunned mobs do no damage.
Level 60 – Cavalier
No one is going to mistake a Tankadin for a Demon Hunter or Monk in terms of mobility, but Cavalier is our best tool. There are many times like the Spiked Tongue attack from Neltharian’s Lair’s Naraxas where the second charge will save you.
Level 75 – Knight Templar
This was a close call between Hand of the Protector and Knight Templar. Hand of the Protector shorter cooldown is appealing, but Knight Templar gives us a 20% damage reduction in addition to reducing the cooldown on Divine Steed. There are so many movement heavy fights where Divine Steed shines in combination with Cavalier and Knight Templar. The cooldown reduction coupled with the charges from Cavalier get us into the same zip code of the other tanks’ mobility. I only wish we didn’t have to invest almost 30% of our talent points to get there.
Level 90 – Judgement of Light
The heal is small, but it better than the zero your ranged will get out of Consecrated Ground, and thus far, I haven’t had the need to kite anything. Aegis of Light requires everyone to collapse on you and there are several mechanics that discourage ranged from coming into melee.
Level 100 – Righteous Protector
Righteous Protector is the best survival talent on the row unless you are fighting many mobs — if you are, handle it! I need all my Shield of the Righteous charges for mitigation so I can’t spare them for Seraphim.
The Dungeons
Most of mechanics in the dungeons can be broken down into major categories:
- Major Cooldown: Abilities you need to counter with a major cooldown like Guardian of Ancient Kings or Ardent Defender
- Fire is Bad: Not standing in the bad stuff
- Face Me: Facing mobs away from the party
- Pardon the Interruption: Interrupting key spells
- Active Mitigation Checks: These are abilities the boss will throw at you which require Active Mitigation to counter or it will nearly kill you or leave behind a debuff that will kill you. The tank dying is generally considered a bad thing and we’d like to avoid that. You got the memo, right? Good. Most of these checks have a cooldown of about 15 seconds which should give you plenty of time to get a charge of Shield of the Righteous prepared. Bastion of Light (if you talented it) can give you a charge right away.
As you look at the drops, keep in mind that Legion is going to encourage us to build gear sets again. You’ll want a Mastery and Versatility set for damage reduction and a Critical Strike and Haste set for more DPS and soloing.
I’ve added some Paladin specific tips for the various dungeons. We don’t have the space for a full strategy guide on each instance so we will assume you have some working knowledge of the encounters already. If you have any additional Paladin specific tips and tricks, please share them in the comments and I will update the entry.
Eye of Azshara
For the Eye of Azshara, I replace Blessed Hammer with Consecrated Hammer. You can kill the initial four bosses in any order, but after you kill second one, Violent Winds will start up every 90 seconds, lasting for 10 seconds. These winds move you in a random direction, but always out of your Consecration!
The trash here can provide some challenges. The Hatecoil Crusher’s Mighty Slam is an Active Mitigation check. You can use Blessing of Freedom if you get snared by the Hooked Net from the Hatecoil Wranglers, and interrupt Hatecoil Stormweavers as much as you can with Avenger’s Shield and Rebuke. Killing some of the trash throughout the instance could benefit from the use of an AOE stun. Go ahead and spec Blinding Light, but know it won’t last as long as most of the other tank’s stuns. This is an example of where Blinding Light being a disorient and not a stun hurts us. Sunwalker’s can still War Stomp.
Warlord Parjesh: Belt, Chest, Survivability Trinket, Neck
Lady Hatecoil: Ring, Bracers, Boots, Holy Relic
King Deepbeard: Cape, Ring, Cooldown Trinket, Iron Relic, Legs
Adventure tested, Serpentor approved!
After Serpentrix submerges, hi ho, Silver and Divine Steed toward his new location. As soon as you are in range of Avenger’s Shield, let it fly to interrupt Rampage and get into melee range.
Wrath of Azshara: Arcane Relic, Neck, Ring, Helmet, Belt
Neltharion’s Lair
Rokmora: Cooldown Trinket, Belt, Neck, Bracers
Use Avenger’s Shield to pick up Blightshard Skitters at range.
Ularogg Cragshaper: Boots, Holy Relic, Cooldown Trinket, Legs, Ring
Paladin, cleanse thyself on from the Toxic Retch. This will free up your healer to cleanse their debuff. Knight Templar and Cavalier are important to survive Spiked Tongue and get back into range.
Dargul the Underking: Chest, Gloves, Iron Artifact, Neck, Shoulder
Fist of Justice the Molten Charskin add during the Dargrul encounter.
Vault of the Wardens
Tirathon Saltheril: Bracers, Shoulders, Ring
Inquisitor Tormentorum: Gloves, Trinket, Cape, Iron Relic
Be cognizant of the Grimguard trash mobs in Ash’Golm’s trash. They have a Mortal Strike ability which hurts us more than other tanks because we are reliant on Light of the Protector’s self-healing for some of our mitigation.
Consider speccing into Final Stand for Ash’Golm. You could bubble to soak the Lava Fissure or Lava Wreath if an Ember is getting too close and still keep threat.
Glazer: Chest, Arcane Relic, Ring, Neck
In Glazer’s Focusing phase, when Glazer gets Beamed, pop wing (Avenging Wrath). If the Radiation damage is getting too high, throw some offheals.
Cordana Felsong: Boots, Gloves, Legs, Holy Relic, Cape
Assault on the Violet Hold
You won’t know which bosses you’re fighting until the instance starts. I’ll suggest a couple of talents you can swap if you wipe after finding out you are facing a specific boss. For the trash, interrupting Fel Destruction is a must.
Shivermaw: Ring, Boots, Stamina Trinket, Cape
Knight Templar and Cavalier help with Shivermaw’s Wing Buffet and for getting up the stairs to avoid getting Frozen by Frost Bomb.
Blood Princess Thal’ena: Neck, Cape, Legs
Final Stand can give you and the last DPS another 8 seconds to finish off Blood-Princess Thal’ena.
Millificent Manastorm: Ring, Bracers, Helmet, Iron Relic
Mindflayer Kaahrj: Neck, Bracers, Ring
The Active Mitigation check here is Doom. The Shadow Crash debuff reduces Light of the Protector’s healing by 50%. Last Defender is helpful with all the adds he spawns.
Anub’esset: Gloves, Armor Trinket, Ring, Legs
Active Mitigation check is Mandible Strike.
Lord Malgath: Loot not available.
When you get to Lord Malgath, Consecration will pick up the melee Shadow Beasts. Use Avenger’s Shield or Judgment to pick up the ones at range.
Sael’orn: Neck, Ring, Helmet, Arcane Artifact, Belt, Shoulder, Holy Relic,
If you get Sael’orn, cleanse yourself of the Venom Spray debuff.
Fel Lord Betrug: Shoulders, Chest, Iron Relic, Cape, Neck, Legs
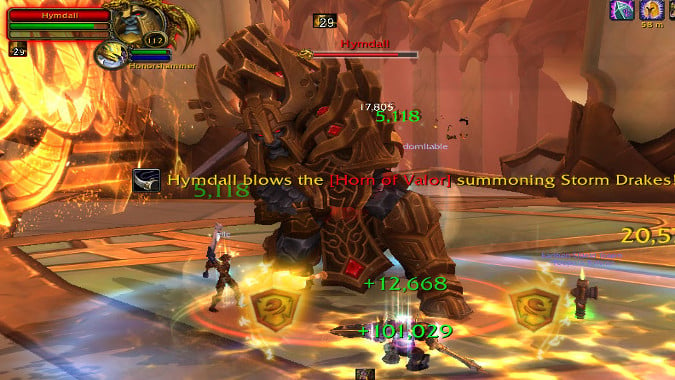
Halls of Valor
Hymdall: Gloves, Stat Trinket, Iron Relic, Chest
Not to be confused with that book you sing out of on Sunday mornings.
Hyrja: Boots, Ring, Wrist, Ring, Bracers, Holy Relic
When Fenryr gets Scent of Blood, you can Blessing of Protection his target to save them.
God-King Skovald: Legs, Helmet, Ring, Iron Relic
Odyn: Shoulders, Cape, Hands, Bracers, Neck, Holy Relic
Divine Steed helps you get out of Odyn’s Radiant Tempest and Avenging Wrath when you get Branded.
Darkheart Thicket
Archdruid Glaidalis: Helm, Ring, Bracers, Arcane Relic
Try to time your Light of the Protector to get the maximum healing to clear the Grievous Tear debuff from Glaidalis.
Blessing of Freedom will break you out of Oakheart’s Strangling Roots.
Dresaron: Hands, Haste Trinket, Neck, Belt
Shade of Xavius: Chest, Ring, Cape, Shoulders, Feet, DR Trinket
Black Rook Hold
Also known as the Ravencrest family reunion!
I go with my standard build as most of Black Rook Hold’s encounters have low movement requirements.
Amalgam of Souls: Cape, Chest, Boots
Illysanna Ravencrest: Ring, Ember of Nullification, Gloves, Cape
Smashspite: Bracers, Ring, Boots
Hold off from casting Light of the Protector so you have it for recovering from a Brutal Haymaker.
Lord Kur’talos Ravencrest: Neck, Holy Artifact, Legs, Helmet, Shoulders, Cape
Maw of Souls
Also known as “Hey, the king’s back!”
Ymiron, the Fallen King: Ring, Iron Relic, Chest, Helm, Buff Trinket
Avenger’s Shield the Runecarver slaves to get them to come to melee in the trash. Screams of the Dead is a fear. Divine Steed out if you can. Dark Slash is all magic damage so consider Holy Shield and/or Blessing of Spellwarding.
Harbaron: Cape, Legs, Arcane Relic, Wrists
If you get the Grimwalker miniboss, you can cleanse yourself of the Bile Breath debuff.
On the Skjal miniboss, Avenger’s Shield can help grab the adds from range and interrupt the casters to force them to come to melee.
Helya: Boots, Neck, Belt, Ring
For Helya’s submerge phase, throw some offheals as your mana allows. This may be a good time to spec into Consecrated Ground. There’s no target in the submerge phase for Judgment of Light and Aegis of Light requires the party to stand still which is not a good idea in that phase.
Please consider supporting our Patreon!
Join the Discussion
Blizzard Watch is a safe space for all readers. By leaving comments on this site you agree to follow our commenting and community guidelines.