How to conquer the Kehjistan Strongholds in Diablo 4
The westernmost region of Kehjistan in Diablo 4 is home to three distinct Strongholds: Alcarnus, the Altar of Ruin, and Omath’s Redoubt, all dangerous ruins in the sands. In the ruined city of Alcarnus, you’ll face Bloated Corpsefiends and a Mad Surgeon. At the Altar of Ruin, you can find the entrance to an ancient Ritual Chamber and face the Dark Cardinal who resides there. In the southern lands of Kehjistan, Omath’s Redoubt is haunted by skeletal remains of Kehjistani and Zakarumite soldiers along with the memories of a long-dead Priestess.
When you enter these strongholds, be prepared to fight enemies two levels higher than you. If you can conquer these Strongholds, you will be rewarded with gear, experience, gold, and +100 Renown.
Tips for clearing Strongholds
Every Stronghold will be teeming with enemies, strong mini-bosses (Elites), and a major boss fight at the end. If you are a solo player, Strongholds present a particular challenge due to the high level of enemies and the massive groups of mobs. While there’s no level requirement for any Stronghold in the game, you’ll want to have strong AOE damage and some crowd control to manage the packs you run into. No matter what class you’re playing, unlocking your Ultimate ability before trying any Strongholds can be a big power boost that will help you tear down enemies. It’s easy to get overwhelmed by waves of mobs, so take it slow and be careful.
On the defensive side of things, boots with an extra evade charge can be extremely helpful to let you jump out of the way of boss (and mini-boss) abilities. But any movement abilities will help you out here, since dodging big attacks will keep you alive. Elixirs, too, can make a difference: look at what you have in your inventory and bulk up your resistances to damage done by enemies in the Stronghold or increase your damage to enemies in the Stronghold. Even if it’s not a huge buff, it will help.
If you want to clear these Strongholds quickly, however, it is best to run them with a friend or two. Going with a group makes this challenging content much more forgiving. If you’re still leveling up, you might also want to consider dropping to World Tier 1 to conquer them; they’re still going to be two levels higher than you, but it doesn’t seem like as much of a challenge when you’re on the game’s easiest mode.
And one very important thing: after you clear the Stronghold, be sure to interact with the Wanderer’s Shrine, which officially “conquers” the Stronghold. If you leave without hitting the shrine, the Stronghold will reset and you’ll have to start over.
Kehjistan Strongholds
- Alcarnus
- Altar of Ruin
- Omath’s Redoubt
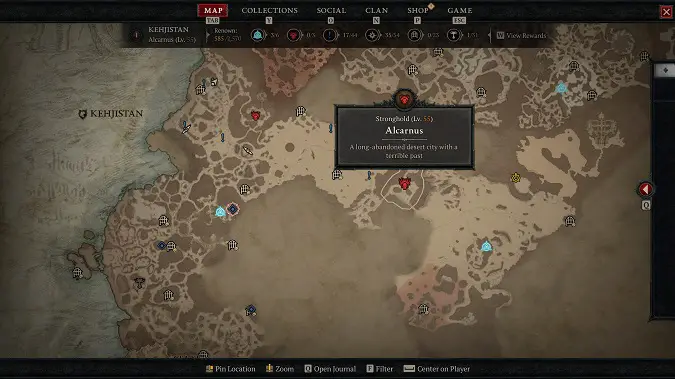
Alcarnus
- Location: North of Tarsarak in the Dunes of Sorrow
- Objectives:
- Explore Alrcanus
- Delve deeper into Alcarnus
- Speak with the Necromancer
- Slay Rashta, the Mad Surgeon
- Investigate the Lair of the Witch
- Destroy one of the Necrotic Masses
- Slay Rashta’s Simulacrums
- Slay Rashta Reborn
- When conquered: Remains hostile.
Explore Alcarnus
Head north of Tarsarak, and you’ll find Alcarnus in the Dunes of Sorrow. You need to explore the city until encounter a Necrotic Mass: you won’t be able to attack the masses now, but perhaps you can find a way.
Slay Rashta, the Mad Surgeon
Head farther north into Alcarnus and into the Lair of the Witch, where you’ll find Rashta, the Mad Surgeon. Speak to her, and she’ll attack you — but it’s a very quick fight, as she has no defenses or abilities. Rashta will flee, but she leaves her Medical Notes behind. Read those and look for more Research Notes scattered in her lair — once you’ve read all three notes you can destroy the Necrotic Masses.
Slay Rashta’s Simulacrums
Each Necrotic Mass will be guarded by a slew of enemies and a mini-boss: the Simulacrum of Rashta. AOE and crowd-control abilities are recommended to handle the sheer number of enemies that will come your way. Take care to clear the area before fighting to minimize adds, though be prepared for more mobs to spawn as you fight. The Simulacrums themselves don’t have too much health, but they have powerful attacks that can kill you quickly, particularly when combined with the adds.
- Mini-Boss: Simulacrum of Rashta (West). The first Simulacrum is the simplest, with poison projectiles that will swirl around it.
- Mini-Boss: Simulacrum of Rashta (East). This Simulacrum will conjure a circle of blood that will deal a ton of damage. The circle will close in on you so if you are unfortunate enough to get caught in it, be prepared to lose a lot of health.
- Mini-Boss: Simulacrum of Rashta (South). Be ready for waves of enemies to attack at the southernmost Simulacrum, which can make this one a bit more difficult. The Simulacrum itself has one attack, a 5-way spirit AOE ability that does considerable damage. Avoid the path of that ability, marked in teal on the screen, and this fight will be over fairly quickly.
Once the Simulacrums have been defeated, head back to the Lair of the Witch.
Slay Rashta Reborn
Once you return to the Lair, interact with the final Necrotic Mass, and Rashta Reborn will appear. Now, you definitely need to defeat her.
This will be a difficult fight, because Rashta has the combined abilities of the three Simulacrums. Particularly for the exploding blood circles, as they do the most damage — but you can evade this easily if you time it right. Watch for the spirit paths, which can also be avoided, and then watch for the spinning poison projectiles. If possible, stay out of range. Rashta will also spawn Imperfect Clones as the fight goes on — they’re fairly weak, but you want to take them out before they can overwhelm you.
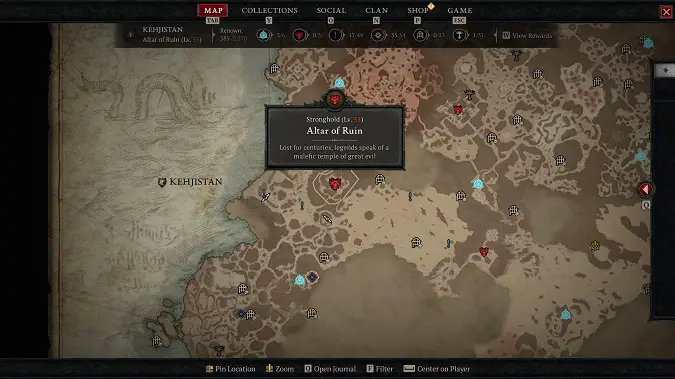
Altar of Ruin
- Location: North of the Iron Wolves Encampment
- Objectives:
- Explore the Cavern
- Find the 3 Keystones
- Use the Keystones to unlock the Ritual Chamber
- Slay Dark Cardinal Maldul
- When conquered: Remains hostile; unlocks a waypoint and the Sepulcher of the Forsworn dungeon.
Explore the Cavern
The Altar of Ruin can be found to the north of the Iron Wolves Encampment: once you arrive, go to the entrance of the cavern and head left. You will need to duck under the rocks to get inside the stronghold. Defeat the enemies you encounter and then inspect the mining cart. Head to the right and duck under the rocks, where you’ll find the slain body of a miner and some rubble you can destroy. Now you can head farther into the Stronghold.
Find the three keystones
- Mini-Boss: Heinrikl Thunderdancer. Head south, and you’ll encounter Heinrikl Thunderdancer, who’s easy to defeat because his only ability is teleportation. He’ll drop a Ritual Chamber Keystone: grab it and continue onward to find the next two.
- Mini-Boss: Orfeo Taintspawn. If you keep following the path, you’ll find an Altar of Lilith, and to the left, you’ll find Orfeo Taintspawn and some adds — fight though the adds gain access to Orfeo. His main attack is a poison ability, and those adds will keep spawning so be ready with your AOE attacks. Once Orfeo is defeated, he’ll drop another Ritual Chamber Keystone.
- Mini-Boss: Severina Doomcaller. Head left past the closed gate, and you’ll encounter Severina Doomcaller. This summoner will have be surrounded by adds, but she’s easy to defeat as long as you kill her before she has a chance to summon a ton of Moon Clan Impalers to help her. Be sure to keep the adds down, or the fight will last longer than it needs to. Defeat her and claim the last Ritual Chamber Keystone.
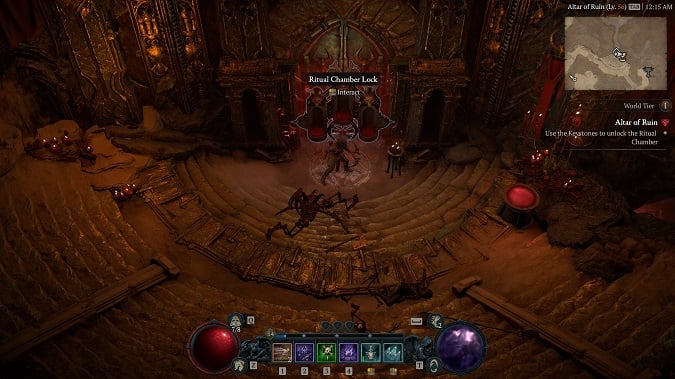
Use the keystone to unlock the Ritual Chamber
Head back to the right and use the Keystones to unlock the Ritual Chamber, then defeat the monsters that spawn around you. Interact with the Chamber door to place each ritual stone, then you can enter the chamber and slay Dark Cardinal Maldul.
Slay Dark Cardinal Maldul
This fight will come in waves. Dark Cardinal Maldul will be shielded from the start and you’ll need to defeat the Annihilator and then the Unholy to get the shield to drop. Now you can go after the Dark Cardinal.
Maldul has three main attacks: he’ll shoot three blood projectiles at you, he’ll summon adds to attack you, and he’ll create a sigil on the ground that can harm you. Towards the end of the fight, the Unholy and the Annihilator will reappear, and you’ll need to fight all three of them while also watching for the adds that keep spawning. Keep their numbers down (if possible), and watch for the sigils on the ground.
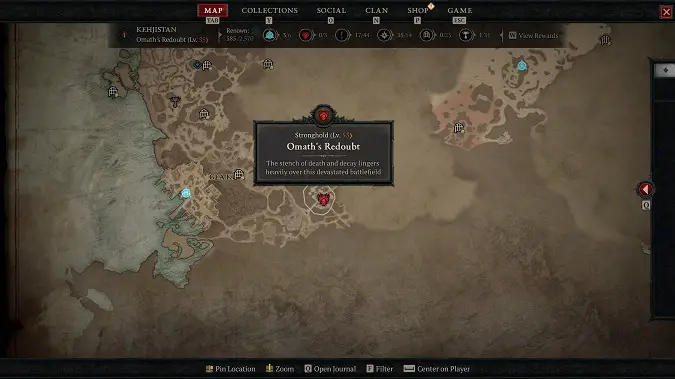
Omath’s Redoubt
- Location: Southwest of Denshar between the Fields of Hatred and the Southern Expanse
- Objectives:
- Investigate Omath’s Redoubt
- Discover the source of the devastation
- Inspect the Ceremonial Staff
- When conquered: Remains hostile; unlocks the Crumbling Hekma dungeon.
Investigate Omath’s Redoubt
You can find Omath’s Redoubt just to the southwest of Denshar between the Fields of Hatred and the Southern Expanse. Once you arrive, there are two ways to get into the Stronghold. The first is through Denshar: head from Denshar to the Stronghold, and look for a cliff to climb. Follow the path, and you can slide down into the Stronghold. The second way is through Gea Kul: go to Gea Kul and head east. When you make it to the Stronghold, there are two ways to climb the wall to get inside.
Discover the source of the devastation
Inside the Stronghold, there will be Kehjistani and Zakarumite skeletons on the ground to investigate and three mini-bosses to defeat. But you can do them in any order, so you may not encounter the mini-bosses in the same order as listed below.
- Mini-Boss: Symme Blightcall. Interact with a slain Kejistani on the ground and a crumbling leaflet will fall. Next, head left and you’ll encounter Symme Blightcall and some adds. Symme is an easy enough fight, but be careful with the additional enemies he summons.
- Mini-Boss: Aleneite Firestarter. Investigate another skeleton of a slain Kehjistani and enemies will emerge from the ground, accompanied by Aleneite Firestarter. This elite fight is pretty quick. Aleneite will summons mortar bombs that will land on the ground around you.
- Mini-Boss: Bardol Thunderdance. Bardol Thunderdance is a straightforward fight: simply defeat Bardol and the adds.
Once you investigate the last skeleton, you’ll need to discover the source of the devastation: head back to the center of the Stronghold.
Inspect the Ceremonial Staff
In the center of the Stronghold, there’s a statue with a Ceremonial Staff. Inspect the staff and a memory will unfold before you: then, the body of the High Priestess Hadar will appear. You must defeat her.
Hadar has a few abilities that do a lot of damage and knock you back. Her main attack shoots several blood projectiles, and she also has an ability that summons a path of blood that will knock you back if you’re caught in it. Just watch out for red lines on the ground and dodge away. Hadar will also summon skeletons to fight alongside her, and it’s important to take these skeletons down quickly, both to prevent them from overwhelming you. During the fight, Hadar will become invulnerable and summon a horde of enemies that you need to defeat before you can attack her again. Unfortunately, she’ll still be damaging you during this phase, so you want to burn down those adds fast. She also has one more knockback ability that has a chance to daze you.
Keep dodging the red paths and fight off the skeleton hordes that she summons. If you know what’s coming, the fight becomes a little easier and a little more predictable.
Please consider supporting our Patreon!
Join the Discussion
Blizzard Watch is a safe space for all readers. By leaving comments on this site you agree to follow our commenting and community guidelines.


