New Warlock pet customizations coming in World of Warcraft’s Seeds of Renewal patch 10.2.5

The World of Warcraft Seeds of Renewal patch 10.2.5 brings new customization options for Warlock pet appearances. While all Warlocks can collect these new appearances, they require one of two specializations to access them.
Want to know more about patch 10.2.5? Check out our guide to all of the major features in Dragonflight patch 10.2.5: Seeds of Renewal!
These appearances are applied to the matching pet type via the barbershop customization interface for a small fee in capital cities. Using the Grimoires unlocked the matched appearance account-wide for any current or future Warlock on your account. Grimoires that drop from raid bosses appear to drop on any difficulty.

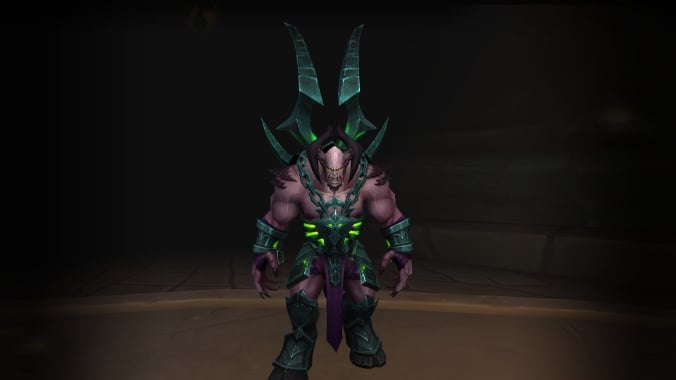
Demonic Tyrant Appearances
In addition to the default appearance, patch 10.2.5 adds four new appearances in three model types. Using Summon Demonic Tyrant requires the Demonology specialization to be active. On PTR these appearances had a guaranteed drop rate from the related elite mob, it’s unclear whether they will have the same drop rate on live.

Grimoire of the Felbrute Tyrant (purple skin/green highlights) — This appearance has a chance to drop from Archimonde, the final raid boss in the Hellfire Citadel raid instance.
Grimoire of the Netherwalk Tyrant (lavender skin/ green highlights) — This appearance is sold by Gigi Gigavoid for 5,000g. To reach Gigi you will need to have unlocked the Warlock Class Order Hall from the Legion expansion. Gigi is faction neutral, and is located in the lower level of the Dreadscar Rift.

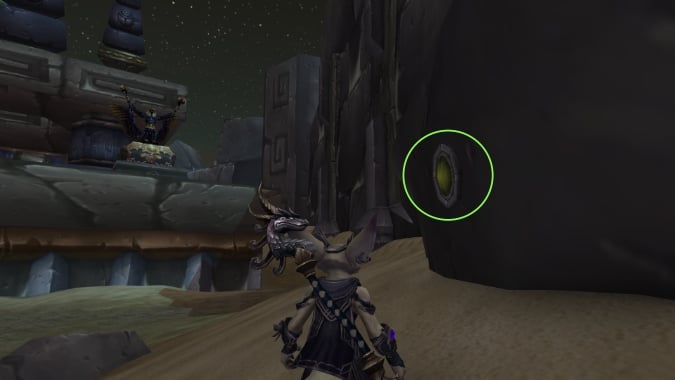
Grimoire of the Vile Tyrant (pale grey skin/green highlights) — This appearance has a chance to drop from Radix in Andorran Wastes.
/way #885 72.45, 67.45 Radix

Grimoire of the Bloodrage Tyrant (red skin/green highlights) — This appearance has a chance to drop from Ixallon the Soulbreaker, a miniboss located in the corridor before Kil’Jaden, the final boss in the Tomb of Sargeras raid instance.

Darkglare Appearances
In addition to the default appearance, patch 10.2.5 adds 11 new appearances in three model types. Using Summon Darkglare requires the Affliction specialization to be active. On PTR these appearances had a guaranteed drop rate from the related elite mob, it’s unclear whether they will have the same drop rate on live.
Darkglare Model
Each of these models requires you to kill an elite mob and loot the matching grimoire. Use the grimoire to unlock the appearance, item is consumed on use. All of the required elites are part of content introduced during the Legion expansion. You may need to complete some quest storylines to reach certain locations.

Grimoire of the Eredathian Darkglare (white skin/purple eye) — This appearance has a chance to drop from Zuraal the Ascended, the first boss found in the Seat of the Triumvirate dungeon instance located in the Eredath zone of Argus.
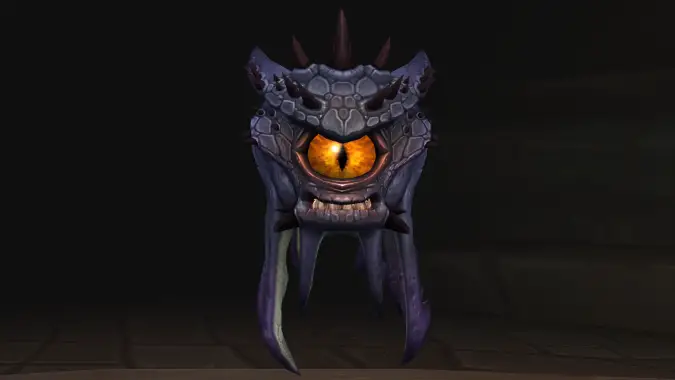
Grimoire of the Riftsmolder Darkglare (dark blue skin/orange eye) — This appearance has the chance to drop from Viz’aduum the Watcher, the final boss in the Return to Karazhan raid instance.

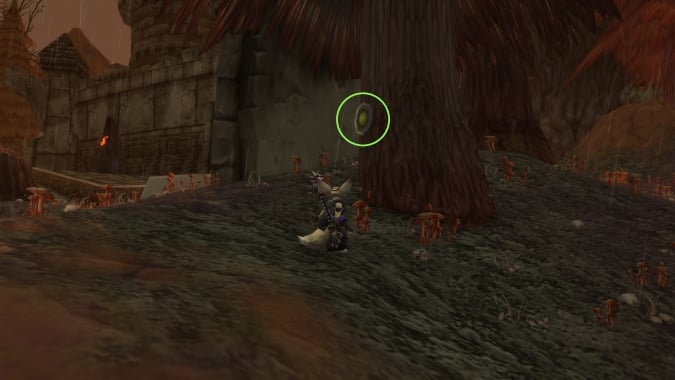
Grimoire of the Xorothian Darkglare (brown skin/yellow eye) — This appearance has a chance to drop from Portal Keeper Hasabel, the fourth boss in the Antorus, The Burning Throne raid instance located in the Antoran Wastes zone of Argus.
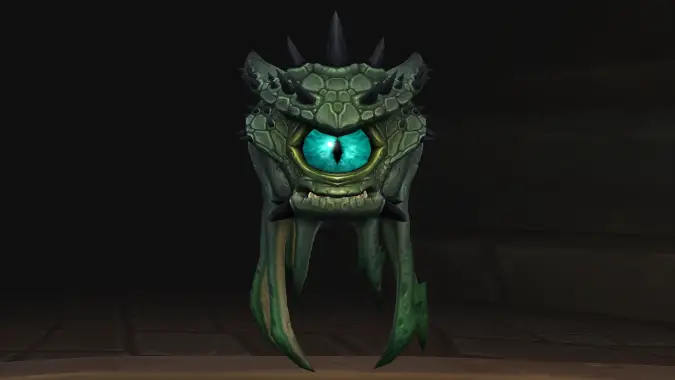
Grimoire of the Abyssal Darkglare (green skin/turquoise eye) — This appearance has a chance to drop from Mistress Sassz’ine, the 3rd boss in the Tomb of Sargeras raid instance located in the Broken Shore zone.
Observer Model
Each of these models require you to click on a Carved Eye plaque, located in Vanilla open world zones. Clicking on the plaque will reward you with a grimoire; using the grimoire will unlock the appearance. The item is consumed on use.

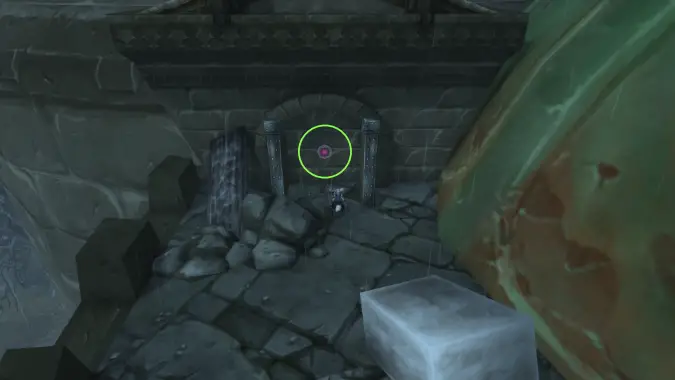
Grimoire of the Mana-Gorged Observer (blue skin/purple eyes) — Click on the Carved Eye hidden behind the doors at the left end of Nightbane’s Terrace in Deadwind Pass.
/way #42 43.85, 72.79 Mana-Gorged Observer Carved Eye

Grimoire of the Whispering Observer (dark grey skin/light blue eyes) — Click on the Carved Eye in the rubble to the right of the platform that leads to Skerem in the outdoors, non-instanced version of Ahn’Qiraj in Silithus.
/way #327 43.0, 9.2 Whispering Observer Carved Eye

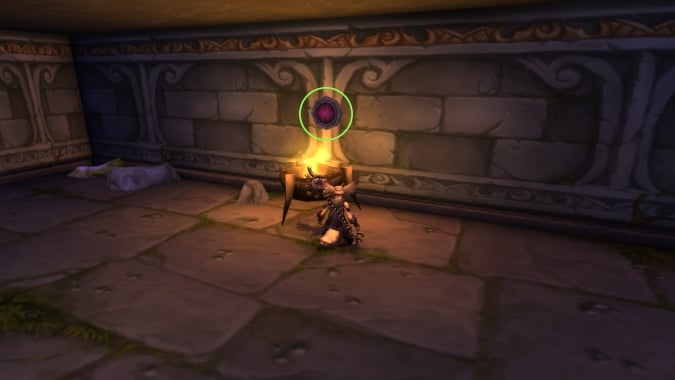
Grimoire of the Plagued Observer (light grey skin/yellow eyes) — Click on the Carved Eye on the tree to the right of the main entrance to Stratholme in Eastern Plaguelands.
/way #23 28.59, 13.42 Plagued Observer Carved Eye

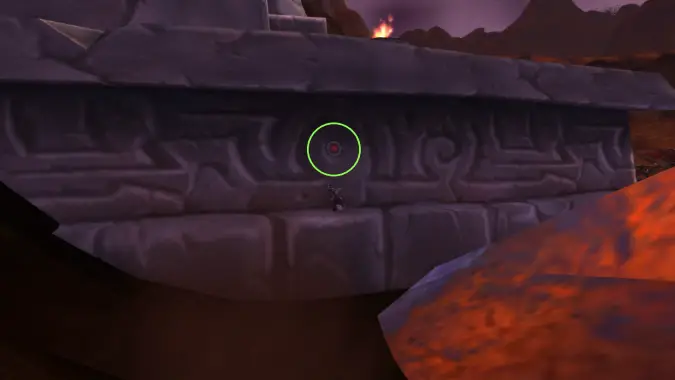
Grimoire of the Dire Observer (pale green skin/magenta eyes) — click on the Carved Eye in the series of rooms under the Maul Arena in Dire Maul in Feralas. The eye is in the first alcove on the left as you go down the passageway.
/way #69 62.06, 30.11 Entry to the Maul Catacombs
/way #69 61.50, 30.11 Dire Observer Carved Eye

Grimoire of the Blasted Observer (red skin/pale grey eyes) — Click on the Carved Eye at the base of the Dark Portal in Blasted Lands. If you can’t see the eye, head over to Zidormi to go back in time. You may need to jump up onto the ledge to reach the eye to loot it.
/way #17 55.62, 53.12 Blasted Observer Carved Eye

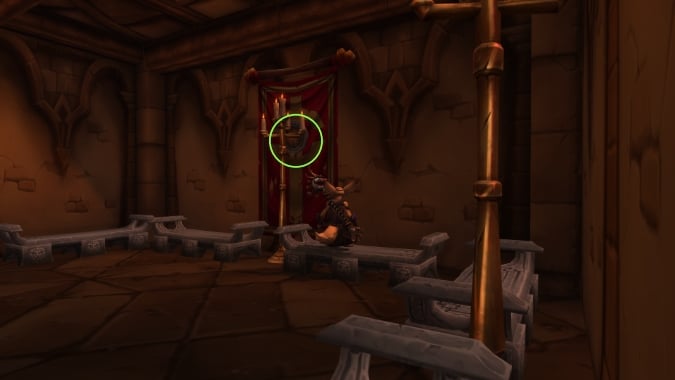
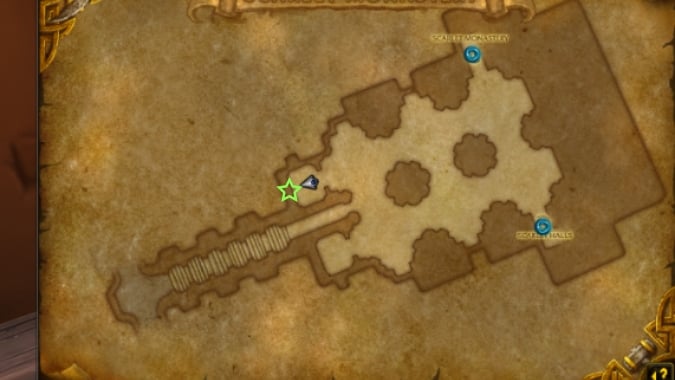
Grimoire of the Zealous Observer (pale grey skin/orange eyes) — Click on the Carved Eye in the first alcove on the left when entering the Scarlet Monastery in Tirisfal Glades.
/way #19 40.54, 53.63 Zealous Observer Carved Eye
Ancient Observer Model (and tips for the puzzle you have to solve to earn it)
This model requires you to solve a puzzle. All the steps of the puzzle are completed in the Throne of Thunder raid instance. If you haven’t unlocked the zone the raid is located in, you can access the LFR version by talking to Lorewalker Han found in the Vale of Eternal Blossoms. Talk to him to enter the Halls of Flesh-Shaping and proceed to Durumu.
/way #390 83.0 30.6 Lorewalker Han
Important things to know before you start:
- You can only kill Durumu once per week per difficulty to get loot.
- The Durumu’s Glass Pupil item is consumed on use.
- If you leave the instance after using the eye, you will need to get a new eye before trying again — so you’ll be out of luck til next week. If you use Teleport out of Dungeon, when you Teleport to Dungeon it will put you on the wrong side of the moat and you won’t be able to return to the puzzle in that instance.
- Once you do solve the puzzle, the Grimoire looted in the last step is treated as a summons item and will respawn if not used before logging out. It will persist for a brief period, probably a similar duration to healthstones.

Steps to obtain the Grimoire of the Ancient Observer:
- Enter the Throne of Thunder raid instance and proceed to Durumu the Forgotten.
- Kill Durumu and loot Durumu’s Glass Pupil.
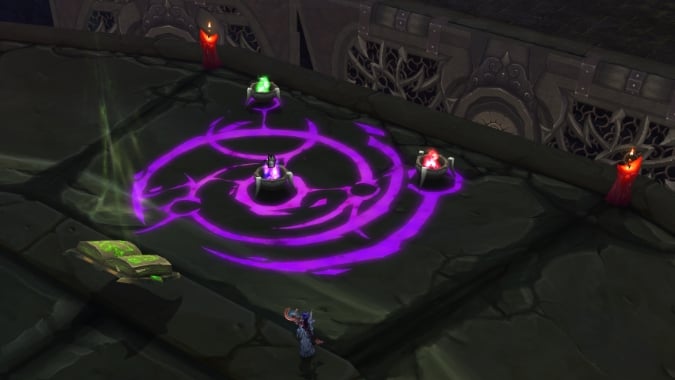
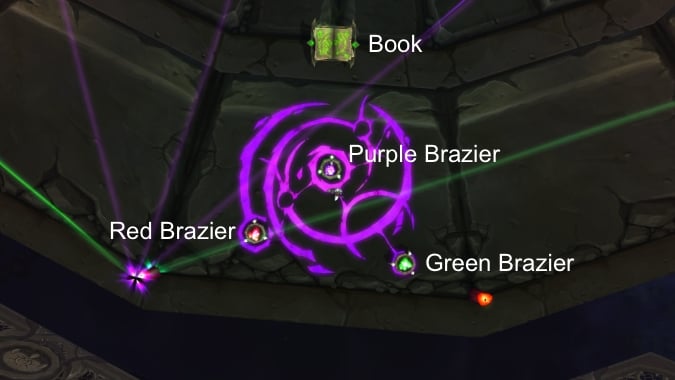
- Use Durumu’s Glass Pupil and ‘throw’ the pupil into the middle of Durumu’s platform. Several small flames will start bouncing around the edge of the platform, each time the hit the ground a candle will spawn.
- When they complete the circuit there will be 16 Candles (yes, really) in total. Then three small braziers and a grimoire on a lectern will spawn.
- Click on the Grimoire to start the puzzle.
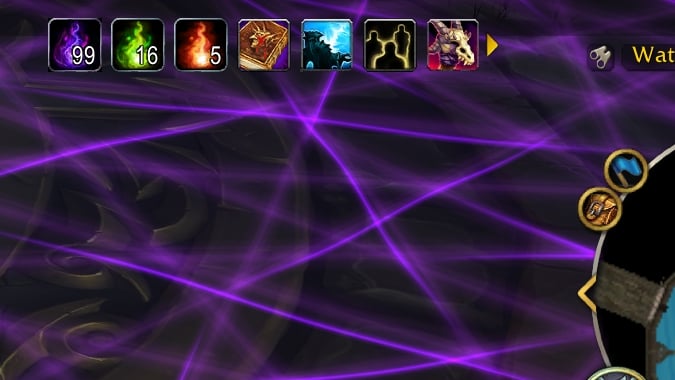
- Count the lines, and then click on the matching braziers to gain a matching buff. Click on the book to move to the next stage of the puzzle.
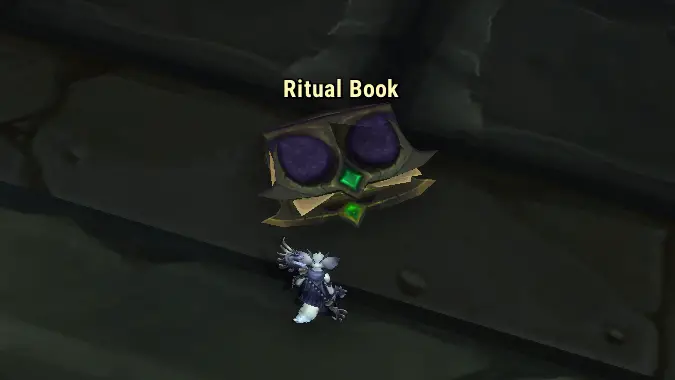
- Solve all 5 stages of the puzzle to spawn the Ritual Book.
- Click on the Ritual Book to loot the Grimoire of the Ancient Observer.
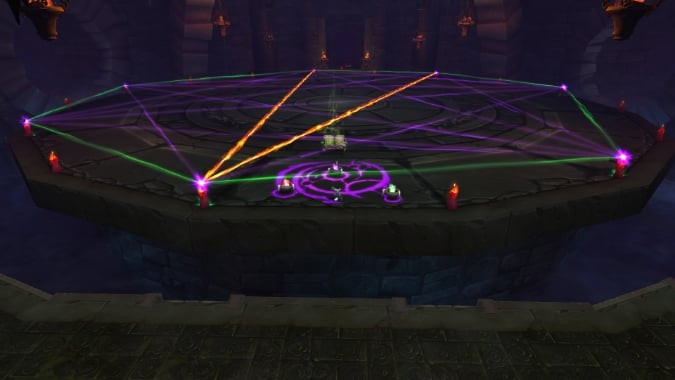
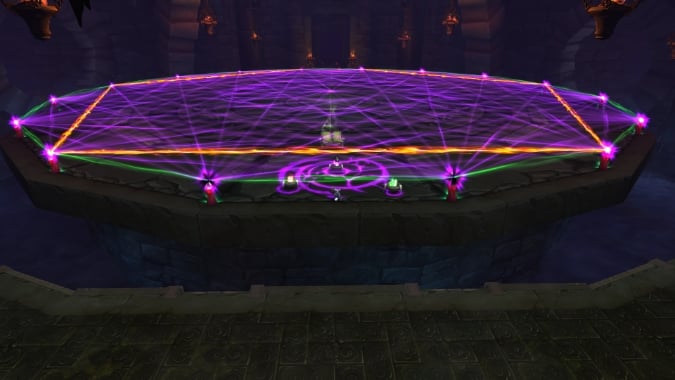
The puzzle has five stages, each one more complex that the last. The puzzles are semi random but all abide by the same rules.
- Count unique lines only, for each colour.
- Click the matching brazier to gain stacks of a buff, get as many stacks as there are unique lines.
- If you click a brazier too many times, you can right-click the buff to clear it and start again.
- The purple count will always increase. The red and green count may increase slightly or stay the same.
- Stage 1 will have a small number of green lines.
- Stage 2 will have a small number of green and purple lines.
- Stage 3 will have a small number of red lines, a medium number of green and purple lines.
- Stage 4 will have a small number of red lines, a medium number of green lines and many purple lines.
- Stage 5 will have a small number of red lines, probably the maximum number of green lines, and a very large number of purple lines.
This is an example of a stage 3 puzzle with the unique lines marked.
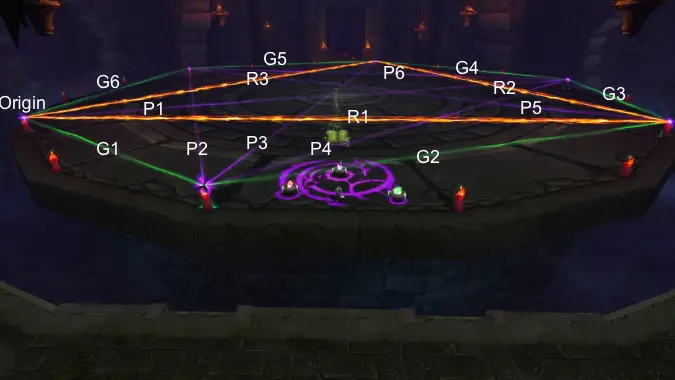
There are two ways of working out the number of purple lines, the first way takes longer but if you are algebra challenged may be the easiest.
Counting the purple lines in the last two stages can be tricky to track, I recommend taking notes to tally up the lines. I will usually start with the red line closest to the braziers, I have been going anti-clockwise (right) around the platform from that starting point. The red lines are easiest to see across the platform.
Starting from your origin point, count all the purple lines touching that candle. As you move around the platform, stop at each candle that has purple lines touching it, only count the lines that point to a candle AFTER your starting point (look down the line towards the start, it will only be lines pointing to the right of that starting candle). Keep going around the ring until you get back to the start.
I found the easiest way to keep track of the purple lines was to write down how many new lines for each candle as I went around the outside edge, then added them all up when I had finished a full loop. It is likely the last candle or two will have no new lines attached to them. The highest number of purple lines I encountered was 101, the lowest number at stage 5 was 81. It can vary substantially so you will need to pay attention.
The second way is quicker but will only work if you feed the correct values into it first.
- First count the red lines = R
- Second count the green lines = G
- Thirdly count the purple candles = p
- The number of purple lines = P
P = (p*(p-1)/2) – (R + G)
When you think you know how many unique lines you have for each color, click on the braziers until you have the matching number of stacks, then click on the book. If you have the correct solution, the puzzle will change to the next stage. If you have the solution wrong, you will be knocked back and take a very small amount of damage. In either case it will clear the buffs, requiring you to click on the braziers again.
When you have correctly entered the solutions for all five stages, the lines, braziers, and lectern will vanish, leaving just the book on the ground.
Loot the book to collect the Grimoire of the Ancient Observer. Use the book immediately, as otherwise the item will despawn from your bags when you log out.
To apply your new demonic follower, head over to a friendly neighborhood barbershop and use the appearance customization feature. Enjoy!
Please consider supporting our Patreon!
Join the Discussion
Blizzard Watch is a safe space for all readers. By leaving comments on this site you agree to follow our commenting and community guidelines.


