How to use Loot Filters in Diablo 4: Lord of Hatred

With the release of the Lord of Hatred expansion, Diablo 4 finally has a Loot Filter system, like many of its biggest competitors already have. But what, exactly, is a Loot Filter, and how can it help you slaughter demons across Sanctuary?
The main function of a Loot Filter is to control which items are shown or hidden (or otherwise highlighted) on your screen, so that you don’t have to endlessly sift through “junk” items until you find something useful. A Loot Filter lets you set up your own rules — from very simple to very specific — so that those junk items won’t even appear on your screen, while items that you have determined to be useful show up normally. You can also highlight specific items, item types, or items that have powers that you want, so that they show up with a special color and you know at a glance something is worth picking up.
You can even import Loot Filters created by other players, to help you zero in on the right items for your class or build without setting up filters yourself.
Essentially, Loot Filters cut screen clutter so that you can focus on only picking up the loot you actually want. But Loot Filters are somewhat hidden in Diablo 4’s game menu, so let’s walk through how to enable and customize Loot Filters.
How do I access Loot Filters in Diablo 4: Lord of Hatred?
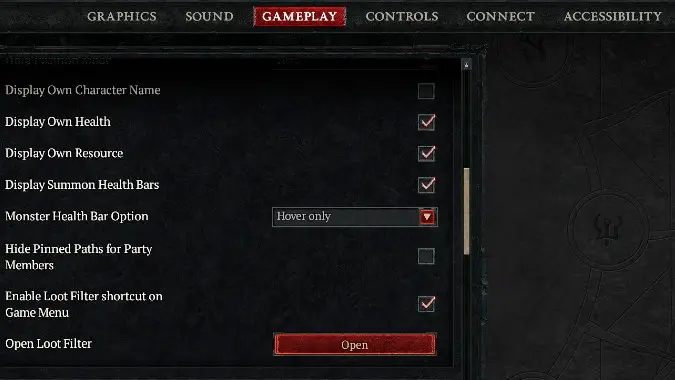
To access the Loot Filter, open the main menu, then go to Options > Gameplay, and scroll down to the big red button at the Open Loot Filter line. Click here to access the Loot Filter screen to set up your filters.
Do notice that there’s also a handy “Enable Loot Filter shortcut on Game Menu” checkbox right above it. If you check that, your main menu now has its own Loot Filter button, as the third option, after “Return to Game” and “Options.” If you’re using the Loot Filter, we recommend turning this on so it’s easier to get into the settings and customize your filters quickly.
How to create (or import) Loot Filters
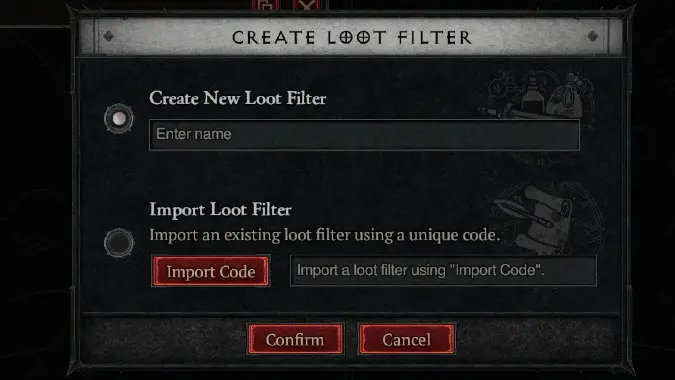
Once you’re in the Loot Filter menu, click the New Filter button at the top left. This will open up a panel with two options:
- Use Create New Loot Filter if you want to create your own filter with its own set of rules. Give your filter a name, and then proceed to the next step.
- Use Import Loot Filter to import a loot filter from someone else, so that you don’t have to do any of this advanced work yourself. You might just find a filter that someone shared on the internet, and use it here directly. Once you do, you’ll have a fully-functional Loot Filter ready to be selected at the drop-down at the top left. Put in the import code and proceed to the next step.
You may create many different loot filters, but you’ll only be using one of them at a time, which you select in the dropdown menu at the top of the Loot Filter screen.
How to create Loot Filter rules and conditions in Diablo 4: Lord of Hatred
Disclaimer: The next two sections may feel a little overwhelming, but trust me: it makes more sense once you get in game and start actually tinkering with it. It’s more intuitive than it might seem by reading about it!
Once your filter has a name and is actively selected, you’ll need to create at least one rule for it. You can create up to 25 rules for each filter, and they’ll be prioritized from top to bottom, so if there are any conflicting rules, the ones at the top will always be the ones that actually take effect. Think of rules as what you’re setting up your filter to do. Do you want to hiding trash items? Highlight items of specific types, or with specific affixes? When you’re making rules, think “macro” first, and you’ll fine tune the “micro” later.
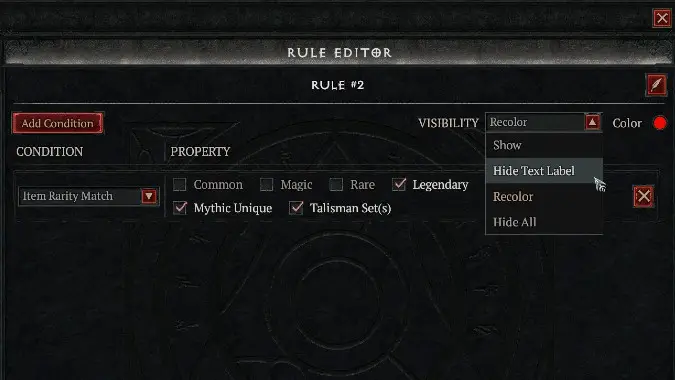
Rules offer four possible Visibility options to determine how loot is displayed:
- “Show” determines that the rule is going to show certain items (that might have been hidden by a previous rule).
- “Recolor” will recolor the item’s text label, so that any item affected by this rule shows up with a different color determined by you, effectively highlighting it.
- “Hide Text Label” and “Hide All” seem to do the same thing (I haven’t been able to find any difference between these two options): they completely hide the item, and you can’t pick it up.
Since rules are ordered from top to bottom in priority, you might have a rule that “hides” all Rare items, but then add a rule above it that “shows” Rare items of a specific item you want (for example, items that have +Fire damage and an item level of at least X). This is why it’s useful to have a “Show” visibility option, allowing you to effectively hide all items of a certain kind except for the specific ones you want.
What are the different conditions for the Loot Filter in Diablo 4: Lord of Hatred?
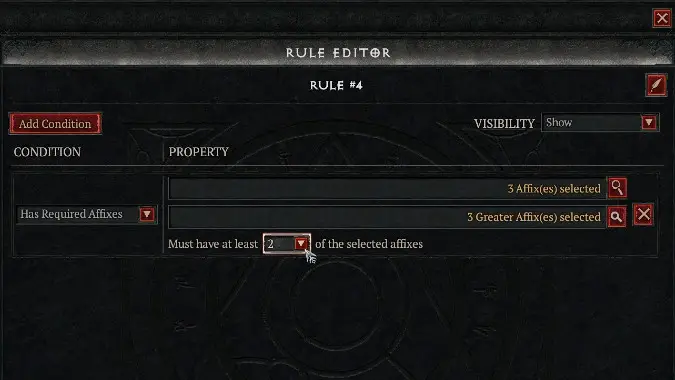
Each of the 25 rules you can add to a filter can have several conditions — currently, there are ten different conditions, and you can add as many of them as you want to a rule. Some of the most useful of these conditions include:
- Item Power Range – you might use this to hide items below a certain item level.
- Item Rarity Match – lets you hide items of a certain rarity, like “Common” and “Magic,” or perhaps highlight “Unique” items with a different color.
- Item Properties – lets you change the visibility of Ancestral items, or perhaps hide items that aren’t Ancestral.
- Greater Affix Check – lets you hide items that have fewer than X Greater Affixes, or perhaps highlight items that have more than Y Greater Affixes.
- Item Type Match – lets you hide or highlight items of a specific type, like “Boots” or “Axes” or “Rings” or “Charms,” etc.
- Has Required Affixes – lets you hide or highlight items that have specific Affixes you choose, like “Life On Hit” or “Shadow Damage Multiplier” or “+X to a specific skill,” etc. This is probably one of the most useful conditions.
- Is Specific Unique – lets you chase a specific Unique you want, highlighting it (or, perhaps, hide one or more specific Uniques you don’t want to see any more).
There are other properties besides those, and more may be added in the future. However, this should give you a good idea of what the system can do, and how much customization power it offers.
How to make the best use of Loot Filters in Diablo 4: Lord of Hatred
When you’re just starting out the game and braving those early levels, you can probably just ignore the Loot Filter. You might, perhaps, want to highlight a certain item type, like two-handed weapons, so that you focus on that instead of one-handers, but that’s the kind of limited use this system will have at the beginning.
By the time you reach mid game, and you’re mostly decked out in Rares and Legendaries, the Loot Filter starts showing its value: you might want to hide junk, Common, and/or Magic items so that they don’t even appear anymore. When you start feeling that fatigue of collecting lots of items that you’re just gonna discard, and even picking them up starts feeling useless, open the Loot Filter and redefine your experience, opting to show quality over quantity.
But Loot Filters truly shine when you reach the end game. You might be chasing specific affixes — for example, maybe your Sorcerer is fully tuned to do Cold damage, so you want any items with +Cold affixes to pop up. Maybe you’re chasing a specific Unique or Charm Set. Maybe you already have most of your gear properly done and you want only the truly top-tier stuff to even tempt you at this point.
Late game is when the Loot Filter becomes your canvas, and you’ll definitely want play around with it so you can spend less time sorting through loot and more time picking up loot you really want.
Please consider supporting our Patreon!
Join the Discussion
Blizzard Watch is a safe space for all readers. By leaving comments on this site you agree to follow our commenting and community guidelines.


