How to conquer the Fractured Peaks Strongholds in Diablo 4
One of the most interesting new features in Diablo 4 is Strongholds, areas overrun with enemies that you can conquer to discover new dungeons, towns, waypoints, or just areas slightly less overrun with monsters. Within the Fractured Peaks there are three Strongholds to conquer, and each Stronghold is unique, with its own terrain and challenges. And while there’s nothing explicitly directing you to do Strongholds, some side quests require a Stronghold to be clear before you can complete it — plus they’re just good for experience, and particularly Renown (+100 per Stronghold).
But Strongholds are tough content. All mobs are two levels higher than you are, with many elites and a final boss encounter before you can clear out the Stronghold to claim it for yourself. We have some tips for you for Strongholds in general, plus a quick rundown of what you can expect from all the Strongholds in the Fractured Peaks.
Tips for clearing Strongholds
Every Stronghold will be teeming with enemies, strong mini-bosses (Elites), and a major boss fight at the end. If you are a solo player, Strongholds present a particular challenge due to the high level of enemies and the massive groups of mobs. While there’s no level requirement for any Stronghold in the game, you’ll want to have strong AOE damage and some crowd control to manage the packs you run into. No matter what class you’re playing, unlocking your Ultimate ability before trying any Strongholds can be a big power boost that will help you tear down enemies. It’s easy to get overwhelmed by waves of mobs, so take it slow and be careful.
On the defensive side of things, boots with an extra evade charge can be extremely helpful to let you jump out of the way of boss (and mini-boss) abilities. But any movement abilities will help you out here since dodging big attacks will keep you alive. Elixirs, too, can make a difference: look at what you have in your inventory and bulk up your resistances to damage done by enemies in the Stronghold, or increase your damage to enemies in the Stronghold. Even if it’s not a huge buff, it will help.
If you want to clear these Strongholds quickly, however, it is best to run them with a friend or two. Going with a group makes this challenging content much more forgiving.
And one very important thing: after you clear the Stronghold, be sure to interact with the Wanderer’s Shrine, which officially “conquers” the Stronghold. If you leave without hitting the shrine, the Stronghold will reset, and you’ll have to start over.
Fractured Peaks Strongholds
- Malnok
- Kor Dragan
- Nostrava
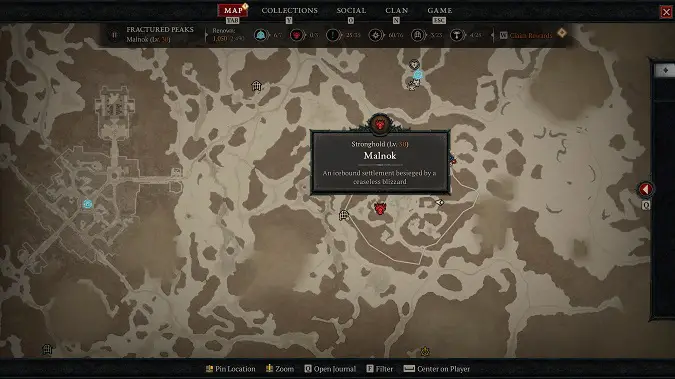
Malnok
- Location: Eastern Fractured Peaks, south of Bear Tribe Refuge
- Side Quest: Hammer of the Champion
- Objectives:
- Slay the Ice Clan Stormcallers
- Slay Frosthorn
- When conquered: Becomes a town with vendors; unlocks the Anica’s Claim dungeon.
Slay the Ice Clan Stormcallers
Entering Malnok is relatively easy, but once you’re inside, you will be faced will tons of enemies, including Impalers, Shamans, Maulers, Bone Warriors, and Corpses. Your first objective will be to slay the Ice Clan Stormcallers. They will be located in the various corners of the Stronghold and will be protected by a Ritual Guardian mini-boss (Elite) that you will need to defeat first. For these encounters, it is important to have your Ice Resistance up (elixirs are your friend!), as many of these enemies will be Cold Enchanted. If you have Crowd Control abilities or anything that helps with Evade or general movement speed, that would also be beneficial in this Stronghold.
- Mini-Boss: Rimescar. Rimescar will drop Ice Orbs on the ground that will freeze you if you touch them. He will move in and out of combat by disappearing from range and will call up walls to trap you and prevent you from evading. The best strategy to use is to run away from the Ice Orbs when they drop and try to stay clear of the Walls. Rimescar has powerful melee attacks, but it helps to remove the additional enemies first so that you do not get overwhelmed.
- Mini-Boss: Winterspear. Like Rimescar, Winterspear will drop Ice Orbs on the ground. He will also throw large red traps on the ground. Avoid these whenever you can because they will force you to run away if you are caught in the explosion. Dodge the orbs and avoid the traps as best as you can to avoid being frozen or terrified. Winterspear is a tough fight, but he will go down easy.
- Mini-Boss: Coldaxe. In addition to dropping the Ice Orbs, Coldaxe will heal himself while causing damage to you and will call up wind that will freeze you. Like the other Elite bosses, dodging the Ice Orbs is key. In this case, avoid getting too close to Coldaxe to avoid its Vampiric ability.
Slay Frosthorn
After these mini-bosses have been defeated, you will be able to attack the Ice Clan Stormcallers. After all three have been slain, you will need to head into the middle of the Stronghold to face Frosthorn.
Frosthorn is a powerful boss who, fortunately, doesn’t have any special abilities. What he does have is strong melee attacks and a jump attack that can do considerable damage. He will also throw Ice Bombs on the ground that will freeze you for a few seconds. There will be the occasional spinning orb that will pull you to him, so avoid those whenever possible. Evade the overhead attacks and keep out of the way of the Ice Orbs, and Frosthorn can be easily defeated.
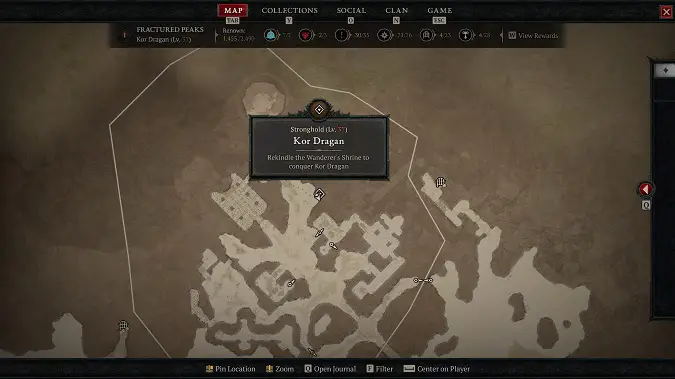
Kor Dragan
- Location: Northeast of Menestad in the Crags of Ill Wind
- Objectives:
- Purge Kor Dragan of vampiric corruption
- Destroy the Vampiric Aberration
- When conquered: Remains hostile.
Purge Kor Dragan of vampiric corruption
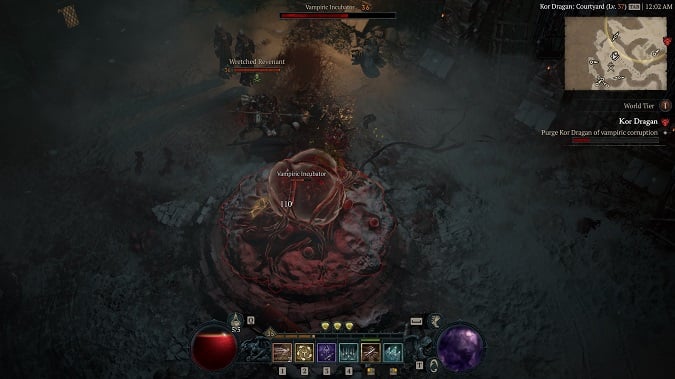
When you arrive, you’ll find enemies overrunning Kor Dragan, and the grounds are littered with bodies. You will need to purge Kor Dragan of the vampiric corruption. There are three Vampiric Incubators that must be destroyed. However, each Incubator is shielded by three Vampiric Corruptions which have to be destroyed before you can attack the Incubator, and then you have to defeat the mini-bosses that appear.
- Mini-Boss: Captain Gylbard Wretchbane. The Vampiric Incubator to the far left of Kor Dragan, in the Courtyard, is guarded by Captain Gylbard Wretchbane. He is supported by Blood Magus, Sanguine Knights, and a Wretch Revenant. Defeat the Sanguine Knights first as they call down lightning strikes, and the Blood Magus’ will strike with magic from range. Wretchbane, himself, is not a terribly difficult fight, but he is strong and has good defenses. If you take care of the adds first, then he is easier to defeat.
- Mini-Boss: Cadogan Pusblister. The Vampiric Incubator in the center of the stronghold, in the Cathedral, is guarded by Cadogan Pusblister and a handful of ghouls, Tainted Revanants, and Blood Magus. It is easy to get overwhelmed by the sheer number of enemies in this area. Do not engage them all head-on unless you have the crowd-control abilities and hit points to do so. Run from the group to get some distance and pick off smaller groups if you can. Pusblister, like Wretchbane, is an easier fight without the supporting enemies. Watch for the poison wells he’ll throw on the ground. He also has a piercing attack that will drain you while healing himself.
- Mini-Boss: Decillius Gorethief. When you finally destroy the Vampiric Incubator, another elite will pop up, Decillius Gorethief. He will have some Sanguine Adherents with him. You can focus your attention on Gorethief first, making sure to hit him and keep your distance.
- Mini-Boss: Frederic Boltcrawler. The Vampiric Incubator on the right side of Kor Dragan, in the Chancery, will be protected by the Vampiric orbs on the ground. You need to destroy these first to gain access to the Vampiric Incubator. Once you do, destroy it, and Frederic Boltcrawler will emerge. Sanguine Adherents will support him, so defeat the Adherents first and then focus on Boltcrawler. He will throw lightning orbs around you, so if you can steer clear of those orbs then this will be a straightforward fight.
Destroy the Vampiric Aberration
After all three Vampiric Incubators have been destroyed, go back to the Cathedral and destroy the Vampiric Aberration. This will grant you access to the Archives where you’ll find Nilcar, Forgotten Bishop.
While Nilcar isn’t extremely difficult, he will have three red blood orbs that will aid him. He will release them one at a time, starting with the Sanguine Adherent, the Sanguine Inquisitor, and the Sanguine Knight. You can fight them, but you will not be able to kill them. Instead, they will be knocked out for a second and then will come back into the fight. Nilcar will throw blood orbs on the ground that will shoot blood projectiles. He will also conjure a Hellbinder that will chain you and restrict your movement. For this fight, incapacitate the enemies that appear and attack Nilcar when they are out of the fight. Avoid the rapid-fire blood projectiles and focus your heavy attacks on Nilcar while continuing to incapacitate his backup.
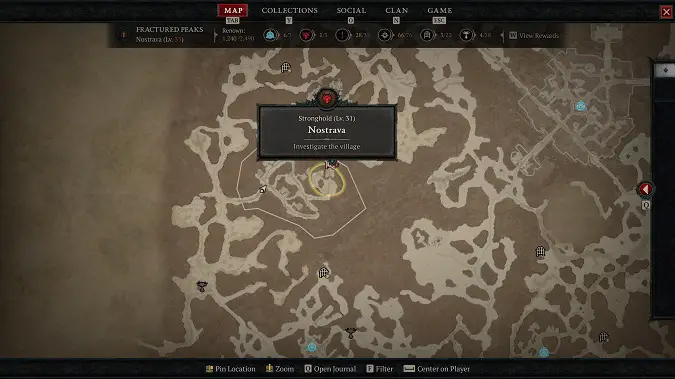
Nostrava
- Location: North of Nevesk, southeast of Menestad, and west of Kyovashad
- Side Quest: Sight to Madness
- Objectives:
- Investigate the village
- Speak with the Priestess
- Destroy the Demonic Effigies
- Return to the chapel
- When conquered: Becomes a town with vendors; unlocks a waypoint and the Cultist Refuge dungeon.
Investigate the village
Start by exploring the village. After checking out every house in the area, you’ll see that all the villagers are in hiding, so head to the chapel.
Speak with the Priestess
You will find the townspeople there along with the Priestess at the altar. Speak to her, and she’ll immediately attack you, as will the townspeople. She will turn into the demon, Nezegal, and fly away, leaving you in the hands of the villagers.
The Crazed Villagers are strong, and if they surround you, you’ll need to find a way out quickly. Use whatever evade/barrier abilities you have and make sure to keep your distance from them. Once the villagers are defeated, you can investigate the inside of their homes.
Destroy the Demonic Effigies
You will find Demonic Effigies in most of the houses, and you need to destroy all of them. But when you attempt to destroy them, you’ll be attacked by demons and elites… or worse. In one house, you’ll be attacked by Styhlez Cagebane, a Waller demon. In another, there’s a vampiric demon named Elegia Razorpulse. These fights should not take long and neither demon has an overly strong ability that you need to worry about.
Return to the Chapel
After destroying the effigies, return to the chapel, where you’ll encounter three of Lilith’s chosen: Negala, Torvala, and Kozira. This is a tough fight as all three of these Chosen have different abilities.
They will throw lighting orbs and shadow orbs. The lightning orbs will do some damage, while the shadow orbs will engulf you, making it harder to see your surroundings. Your abilities will also be removed until you can clear the shadows. This is a particularly challenging fight because you will need to deal with three strong elites. While they do have their strong abilities, it is pretty easy to isolate one of them at any given time, which allows you to do considerable damage to one while ignoring the other two. If you have crowd control abilities, use them when possible.
Please consider supporting our Patreon!
Join the Discussion
Blizzard Watch is a safe space for all readers. By leaving comments on this site you agree to follow our commenting and community guidelines.


