How to conquer the Dry Steppes Strongholds in Diablo 4
The Strongholds within the Dry Steppes in Diablo 4 are particularly challenging, overrun with cannibals, bandits, and Diablo’s ever-present demonic hordes. As you make your way through the Ruins of Qara-Yisu, the Temple of Rot, and the Onyx Watchtower, you’ll be facing enemies that are not only two levels higher than you but are led by strong mini-bosses who are in turn led by even stronger bosses. So be prepared to face Cannibal Champions while trying to save prisoners, raze a bandit encampment while fighting off powerful bandit lieutenants, and defeat the Infernal Spire Guardians while an ominous voice from below speaks to you.
If you succeed, the gear, experience, gold, and +100 Renown will be completely worth it. So let’s talk about how to clear out all of the Strongholds in the Dry Steppes.
Tips for clearing Strongholds
Every Stronghold will be teeming with enemies, strong mini-bosses (Elites), and a major boss fight at the end. If you are a solo player, Strongholds present a particular challenge due to the high level of enemies and the massive groups of mobs. While there’s no level requirement for any Stronghold in the game, you’ll want to have strong AOE damage and some crowd control to manage the packs you run into. No matter what class you’re playing, unlocking your Ultimate ability before trying any Strongholds can be a big power boost that will help you tear down enemies. It’s easy to get overwhelmed by waves of mobs, so take it slow and be careful.
On the defensive side of things, boots with an extra evade charge can be extremely helpful to let you jump out of the way of boss (and mini-boss) abilities. But any movement abilities will help you out here, since dodging big attacks will keep you alive. Elixirs, too, can make a difference: look at what you have in your inventory and bulk up your resistances to damage done by enemies in the Stronghold or increase your damage to enemies in the Stronghold. Even if it’s not a huge buff, it will help.
If you want to clear these Strongholds quickly, however, it is best to run them with a friend or two. Going with a group makes this challenging content much more forgiving.
And one very important thing: after you clear the Stronghold, be sure to interact with the Wanderer’s Shrine, which officially “conquers” the Stronghold. If you leave without hitting the shrine, the Stronghold will reset and you’ll have to start over.
Dry Steppes Strongholds
- Ruins of Qara-Yisu
- Temple of Rot
- The Onyx Watchtower
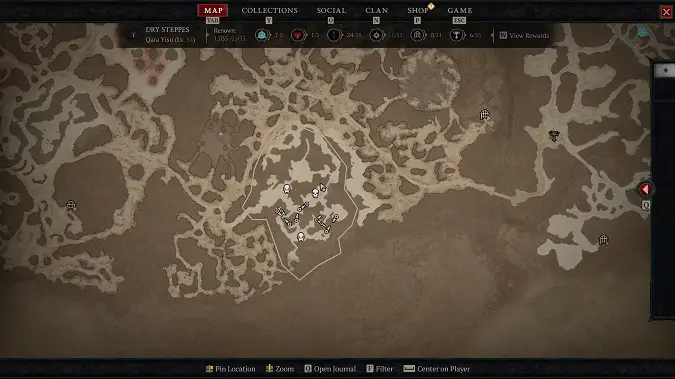
Ruins of Qara-Yisu
- Location: East of Jirandai and west of Nevesk
- Objectives:
- Find and destroy the Infernal Spires 0/3
- Slay Utulku
- When conquered: Becomes a town with vendors and a waypoint.
To find Qara-Yisu, you can go to Nevesk and travel west or go to Jirandi and travel east. Once you’re there you need to find and destroy all three Infernal Spires.
Find and destroy the Infernal Spires 0/3
- Mini-Boss: Arzun Icefist. As you try to take down an Infernal Sprie, Arzun Icefist will appear. He’ll try to freeze you when possible. He’s tough, but attacks that do damage over time can help you out here, so you can dodge his melee attacks while your damage keeps rolling. Keep your eyes on the ice orbs that he drops.
- Mini-Boss: Arzun Rotthruster. The second Infernal Spire will be guarded Arzun Rotthruster. This poison-enchanted elite enemy has additional enemies with him, including Vile Overseers and Vile Shamans. He’ll drop poison wells at your feet, but they’re easy to maneuver around. Attack from a distance, or you can trap him on the steps for an easier kill.
- Mini-Boss: Fryzoh Midnight. The last spire is guarded by Fryzoh Midnight. Defeat the adds before attacking Fryzoh, but if you have strong AOE, you can take them all on at the same time. Fryzoh has powerful melee attacks and the adds can overwhelm you, so be careful. Once he’s defeated, you can take down the last Infernal Spires.
Slay Utulku
After taking down the last spire, you’ll release Utulku, the Voice Below: go to the center of Qara-Yisu and confront him. Utulku will summon adds to AOE down, or break out crowd control abilities to make the mobs manageable. Be ready to dodge the lightning strikes Utulku calls: you’ll see red circles on the ground before they hit, so get out of the way. Keep hitting Utulku while managing the adds and dodging attacks, and you’ll be good.
When Utulku is defeated, you can rekindle the Wandere’s Shrine to conquer Qara-Yisu.
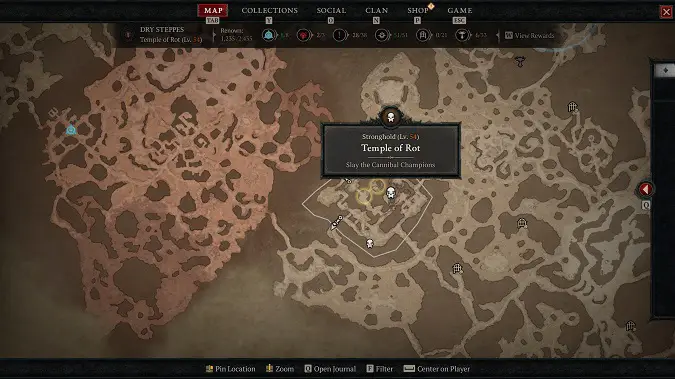
Temple of Rot
- Location: North of Jirandai
- Objectives:
- Slay the Cannibal Champions
- Locate Molqarth’s Lair
- Slay Molqarth
- Slay the Spawn of Molqarth
- When conquered: Remains hostile.
Slay the Cannibal Champions
When you arrive, start by killing off the Cannibal Champions and free the bound prisoners nearby. For every bound prisoner, there will be a handful of enemies to defeat.
- Mini-Boss: Arden, The Ravenous. Arden is a simple fight but watch for the lightning he drops in his path. He can also teleport out of melee, so you may have to dash across the battlefield to keep up. His attacks are lightning-enchanted, so if you’re having trouble, pop the appropriate elixir to give yourself some extra resistances. Once he’s defeated, you can rescue the bound prisoners.
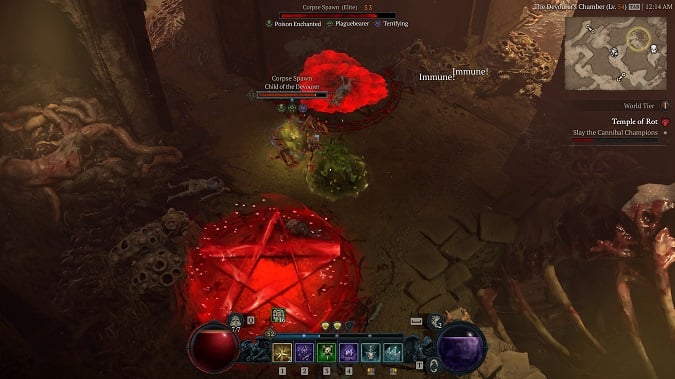
- Mini-Boss: Corpse Spawn, Child of the Devourer. Corpse Spawn will be surrounded by enemies, so any AOE or crowd control damage will be useful here. This mini-boss is poison-enchanted and will drop poison wells on the ground, as well as terrifying you — dodge out of the way of its attacks to stay safe. When Corpse Spawn is defeated, quickly step away because it will explode.
- Mini-Boss: Razorface. Razorface will throw up walls to contain you as well as try to freeze you in place, all while dropping explosive bombs around you. Dodge these attacks as best you can while taking out the adds. Once Razorface is defeated, free the prisoners nearby.
- Mini-Boss: Bostar, The Breaker. Bostar will send Cannibal Neophyles at you that you will need to defeat before he joins the fray. When he does, he’ll summon shadow clones to fight you: ignore them and focus your attacks on Bostar. He has two additional abilities, one that will force you to run away and one that will suppress you. Once he’s defeated, you can free the remaning prisoners.
Locate Molqarth’s Lair
After these mini-bosses have been defeated, it is time to locate Molqarth’s Lair. Head to the northern part of the stronghold where you’ll find three more mini-bosses: Molqarth’s Chosen.
- Bonecruncher
- Bloodrinker
- Fleshtearer
They will attack you at the same time. All have vampiric abilities, so they can heal themselves while damaging you. You can try to isolate one and do damage as quickly as possible, but you can take them all on together with enough damage — strong AOE will shine here. Fleshtearer will summon electric spikes that will transfer lighting back and forth and damage you if you’re caught in the middle, so you may want to focus him first.
Slay Molqarth
Molqarth can be tough, and we recommend using either a defensive elixir (poison resistance can really help) to boost survivability or an assault elixir to increase attack speed to make the fight go smoother.
Molqarth the Hungerer has a few main attacks. He’ll slam his weapon down and call forth waves to attack you and knock you back, and summon poison wells around you, which can be a dangerous combination. Position yourself carefully so you aren’t knocked into poison. If Molqarth eats the eggs in the area, he’ll go berserk and throw out poison bombs.
This is a difficult enemy to fight unless you have good timing in your evades and extra evade abilities. If you’re particularly careful, you can sneak around him before the fight to destroy the egg sacks he has in his lair before starting the fight, which at least eliminates some of his resources.
Slay the Spawn of Molqarth
After you defeat Molqarth, the Spawn of Molqarth will come out of his body. The Spawn of Molqarth will throw out poison bombs as well, and it has two scythes for hands, making it a deadly dual-weapon enemy. It leaps into the area to strike you, dealing massive damage. It will also throw poison wells onto the ground, but at least it won’t try to knock you into them. Lastly, it has swarms of flies that surround it throughout the entire battle, ensuring a constant barrage of attacks.
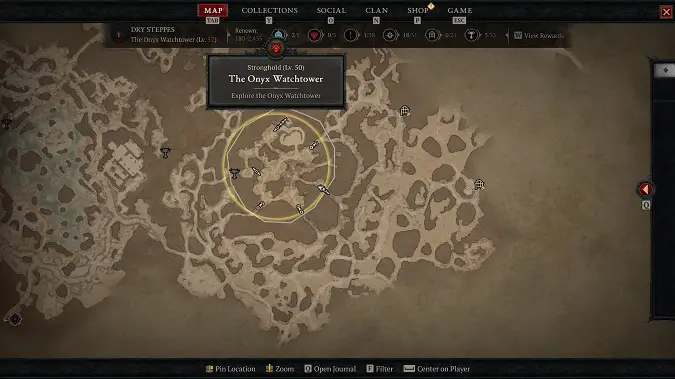
The Onyx Watchtower
- Location: South of Ked Bardu, near the Khargai Crags
- Objectives:
- Explore the Onyx Watchtower
- Purge the bandits and raze their encampment
- Slay the Captain’s lieutenants
- Find Captain Ezmin inside the Watchtower
- Slay Captain Ezmin
- When conquered: Becomes a town with vendors; unlocks a waypoint and the Onyx Hold dungeon.
Explore the Onyx Watchtower
To reach the Onyx Watchtower, head south of Ked Bardu. Duck underneath the broken gate to get inside the watchtower. As you explore, you’ll find that the Watchtower is overrun with bandits.
Purge the bandits and raze their encampment
Not only will you need to purge the bandits and raze their encampment, you will also need to slay the Bandit Captain’s many lieutenants. Take down the support beams to bring down the buildings, as well as destroying any supply carts and bandit tents you find.
Slay the Captain’s lieutenants
- Mini-Boss: Crocus the Greedy. This lieutenant will drop poison wells all around you. Avoid them and attack from a distance if possible. Crocus is also incredibly quick and will cloak at times. Once defeated, he drops the Storeroom Key.
- Mini-Boss: Thidrek the Beast-Master. Keep going around the camp, and you’ll find Thidrek, who will teleport to your location and do considerable damage. He’s poison imbued and can also hold you in place while he heals himself, so you’ll want to take him down quickly.
- Mini-Boss: Talida. Talida will shoot mortar shots around you that deal fire damage and limit your sight, so dodge away from the red circles. Other than that, she has a multi shot and does some poison damage.
- Mini-Boss: Hargrin. Hargrin is the last of Ezmin’s lieutenants. He’ll have a couple of Slicers at his side and he’ll call a shadow clone to fight alongside him, but ignore the clone and focus on Hargrin. He’s in a small room where you have limited maneuverability, and he makes the most of it. He can terrify and he’ll call up walls to trap you, so it’s best to kite him out of the room.
After defeating the lieutenants, go after Captain Ezmin.
Find and Slay Captain Ezmin
Captain Ezmin will call down meteors in multiple areas and drop poison wells on the ground that do damage over time — dodge what you can. There will be Marauder Sand Slicers that will join her, and you’ll want to take down these adds but keep as much focus as you can on her. When Ezmin is defeated, go and rekindle the Wanderer’s Shrine to conquer the Stronghold.
Please consider supporting our Patreon!
Join the Discussion
Blizzard Watch is a safe space for all readers. By leaving comments on this site you agree to follow our commenting and community guidelines.


