Tips on how to beat Emperor Thaurissan in Hearthstone Mercenaries
Hearthstone‘s Mercenaries mode has proven to be popular — at least by the writers on this site. While the game gets harder once you unlock Felwood and Blackrock and their level 30 bounties, for the most part the fights are pretty intuitive, until you get to the third boss of Blackrock, our beloved old friend Emperor Thaurissan.
This fight is the first with an intrinsic Berserk Mode, as killing Moira Bronzebeard Thaurissan will buff the Emperor dramatically. Complicating matters is the fact that there is an abomination and two powdered kegs on the board. Killing any one of these can start a chain reaction that will spell doom for your attempt. As a result, control and timing are the keys to winning this fight, and are something you need to plan for from the start.
While I do expect that in time this fight will become easier (once everyone has a full roster of level 30s with maximum synergies), as of now it is the most likely fight that’ll cause frustration. Here are some tips that may help you win the fight.
Reaching the Emperor
- Plan your path from the start, with an emphasis on getting to the end with as little struggle as possible. Try to avoid elite fights and aim for spirit healers even if you don’t think one of your Mercenaries is likely to die along the way.
- Be wary of Protector buffs as they will likely help the Emperor more than you — but definitely grab any Caster buffs you can get.
- Whether or not you avoid the Mystery slot on your map is up to you but it’s probably not a bad idea to give it a miss — the Mysterious Stranger and Sabotage are unlikely to make a difference in your run (Sabotage doesn’t impact the boss). The Blue Portal to boss might be helpful to skip a few fights albeit at the cost of additional treasures, and the Spud M.E. will make the fight even more complicated.
- Keep your Casters alive at all costs, as you’ll need their critical damage. Unfortunately the AI likes to target them (especially with any Fighters) so be prepared with healing and taunts if you use them in a fight.
- When selecting treasures, avoid those that will reduce your control in the final battle, especially snipes and lifesteals that are used before the fight begins. Saronite Armor (the character does not take critical damage) is a solid choice for any Fighter Mercenary, and Commanding Shout (team health can’t drop below 1) can help keep your team alive in critical moments. Treasures that increase the number of targets your abilities hit should be carefully considered as they can reduce the control you have on the board. The Horde and Alliance flags are always desirable — while the attack bonus won’t be as useful, the extra health for your Casters is important.
Get ready to Blackrock and roll
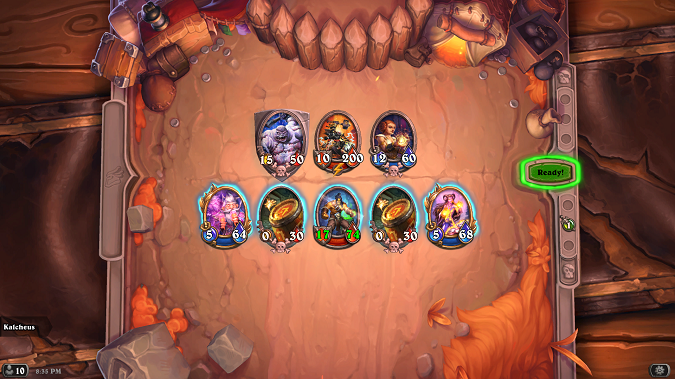
When you get to Emperor Thaurissan, you are greeted with three opponents and two “allies” — the powdered kegs. You can position your mercenaries around the powdered kegs however you want, although it is recommended you keep them separated.
- “Abomination 4” is the completely unoriginal name of the tank that Thaurissan has to the left. It is neutral, so it does not naturally receive any critical damage. It tends to attack using the normal AI priority system, so it’ll usually go after your lowest health Caster first. The Deathrattle will do 15 neutral damage to everyone on the board.
- Despite having a Protector type, Emperor Thaurissan otherwise acts like a Caster that does heavy fire damage. You will usually be alerted as to what the target will be, but a lot of the abilities have cleaving features that you’ll need to keep in mind.
- Moira Thaurissan tends to attack more than cast, and has no sense of self-preservation — she will attack the powdered kegs even if doing so will get her killed. Her Deathrattle will buff Emperor Thaurissan significantly, and is therefore to be avoided until he is ready to die.
- Powdered kegs can only move left or right 1 space during the turn, and do 30 damage to everyone on the board when killed. As a result, if one goes usually the other does as well (unless you’ve intervened with direct healing for one of them). Note that since they are considered part of your team, they will receive any AOE healing and can be targeted for similar effects.
The most straightforward strategy is to burn down the Emperor with Caster abilities, absorb damage from your opponents while keeping the kegs and abomination from blowing up, and hope that Moira doesn’t kill everybody.
This is, of course, way easier said than done.
Tips for ending Thaurissan’s reign
- As mentioned multiple times, your goal is essentially to keep Moira alive long enough for your Casters to do significant damage to the Emperor so that if she does die you’ll be able to finish him off quickly. You can cast your own healing spells on Moira, so if you have powerful heals that may be a way to keep her up despite an explosion.
- Always look at the abilities that the opponents are using during the turn, they’ll usually tell you who the target will be. Remember that if the “lowest health” mercenary is the target, it can be one of the powdered kegs — the AI has zero survival instinct.
- The kegs themselves don’t have to be moved every turn, but keep an eye on their positioning. Thaurissan has abilities that will cleave a neighbor of the target, so you may want to move a keg out of danger. Also remember they can be healed, and they can be protected by abilities such as Commanding Shout.
- Check the speeds when determining what abilities to use, and remember that ties on your team are resolved in the order you selected them. Be patient and take your time! There’s no time limit in this mode so take advantage of that fact.
- Small Bada-Boom: The abomination will take damage attacking your mercenaries, so you may find the encounter easier to deal with by dispatching him first (this will also free up any mercenaries with big attacks to hit the Emperor instead). The 15 damage won’t usually kill the powdered kegs, but it does bring them closer to explosion so be sure you’re able to protect them for some time afterwards.
- Big Bada-Boom: if you still have mercenaries on your bench, the quickest way to victory is to blow up the entire board as long as Thaurissan’s health is low enough that it’ll take him down with it — or if he does survive it’s with so little health he can be killed off by your bench mercenaries before he rage kills them. Again, be patient and make sure that you’ll actually be able to pull this off correctly; a controlled explosion is better than an uncontrolled one, but it has to be controlled enough is such a way that it’ll bring you victory.
Those are some of the tips we’ve found to overcoming this challenge of Hearthstone Mercenaries mode. Hopefully if this is the first significant challenge you’ve encountered you’ll be able to take advantage of them, get past the Emperor, and fight Ragnaros and his minions.
Please consider supporting our Patreon!
Join the Discussion
Blizzard Watch is a safe space for all readers. By leaving comments on this site you agree to follow our commenting and community guidelines.


