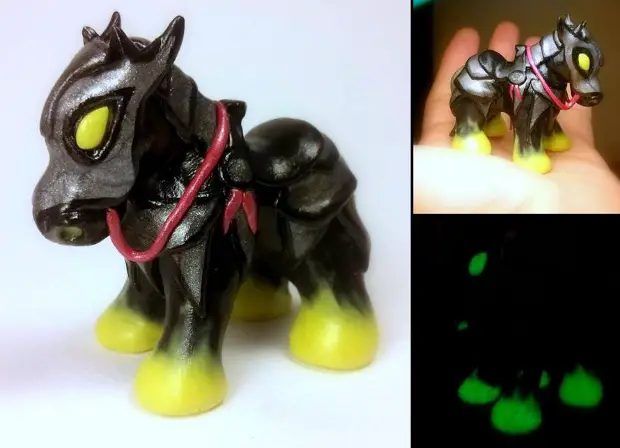
Euphyley recreates Warcraft on a small scale with sculpted figurines
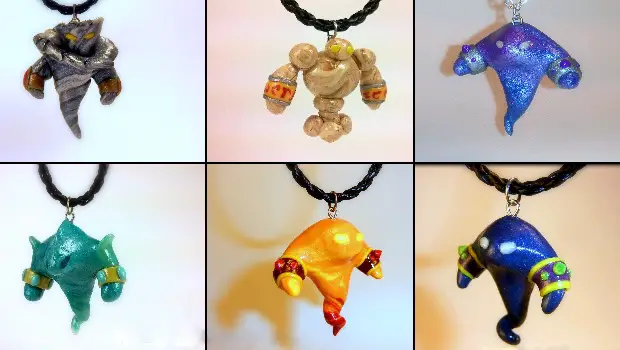
If our desks at the Blizzard Watch (virtual) office are any indication, Warcraft isn’t something that stays confined to video games. It begs to leap from the computer screen and into the real world with art, plushies, and figurines, which find homes on bookshelves and workspaces, bringing a bit of Warcraft into our workaday world. And though we’ve no lack of such pieces, we love Euphyley’s miniature additions to the Warcraft pantheon.
Euphyley sculpts small scale figurines — some sized to be jewelry or ornaments — based on Warcraft characters that become extra adorable when created on a small scale in brightly-colored clay. We caught up with Euphyley to ask about her work.
Blizzard Watch: Based on your art, I’m making the guess that you play WoW: what do you play?
Euphyley: Yes, I do play WoW. I’ve been playing for about 8 years now. I did a bit of progression raiding during the BC and Wrath eras. These days time is a bit more limited with a toddler running around the house, so I do a lot more solo play and a silly amount of pet battling and achievement gathering.
As for other Blizzard games, I really like playing Hearthstone. I especially loved the Naxxramas expansion. Building decks and playing against what sometimes seemed like an AI that was just straight up cheating was a TON of fun. On that note, I’m really looking forward to the Blackrock Mountain Adventure being released next month.
BW: How did you get started with making these figurines? How long have you been making them?
E: Working with polymer clay is something that I’ve been doing for years — I’m talking like all the way back to grade school. The vast majority of pieces I create are jewelry pieces, which is what I started making back then. I got into sculptures more recently (within the last few years). I was inspired to give sculptures a shot by my ultra-talented friend and guild-mate Kelsey, of Little Fat Dragons.
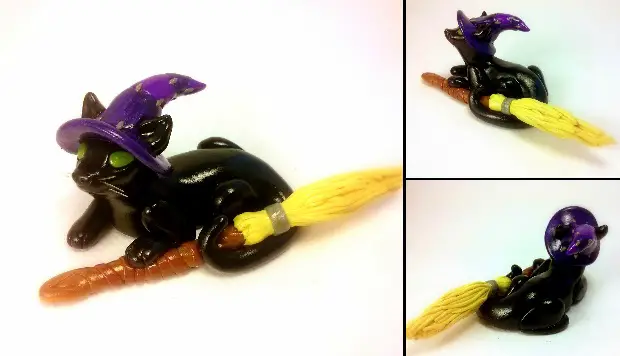
BW: What got you started with World of Warcraft art?
E: Let me just start off by saying that when I’m not actively playing WoW I very much enjoy partaking in the WoW universe in some way — usually by creating SOMEthing for the community. Before my daughter was born I spent a lot of time writing on my WoW-themed blog which was entirely devoted to finding rare spawns and writing up guides for various hunter-related taming challenges. During the past couple of years the rate at which rare-related anything was coming out was too much for me to keep up with though, especially with far less free time on my hands. That is when I decided to give the blog a rest for a while, and decided that I could continue “producing” content in a much more relaxing way. Nap times & bed time for the little one = time for mommy to craft!
Let’s just face it, if you’re going to be creative, why not do it with something that you genuinely love? I’ve always been big into creating fantasy art through various mediums such as drawing, painting, recently digital art, and of course clay — it only made sense to give WoW art a shot. I initially made a few small WoW-themed pieces for myself and then shared them on social media – people seemed to really like what they were seeing and wanted more. It just kind of snowballed from there.
BW: Could you give us a step-by-step on what goes into making a finished piece?
E: For sculptures and for jewelry pieces the process is fairly similar. The major difference between the two is that a lot of sculptures require some kind of armature to strengthen the piece and allow it to cook in an oven. You can’t really cook large, thick areas of clay without running into difficulties — one of the major ones being cracking.
For most sculptures the very first thing I do is build the armature. I use a combination of wire and aluminum foil for most projects. I get the basic shape that I want with the wire, and then shape the foil around it.
Once I’m happy with the armature I choose the colors of clay that I’m going to use, and more often than not I have to mix colors to get the desired effect I’m aiming for. (For instance, the water elementals that I make take me about 6 different colors to get the right color, adequate sparkle and the ‘watery’ look that they have.) Mixing the clay takes quite a bit of time, as the clay comes in solid blocks and needs some conditioning to make it soft enough to work with.
After the colors have been mixed I begin to shape the actual piece. To get the general shape of whatever I’m aiming to create I simply use my hands as tools. Once things start coming together I pull out some of my more specialized clay tools to work on the more elaborate details.
When all of the details are in place and I’m happy with what’s in front of me I clean the piece before it goes in the oven. I use rubbing alcohol to clean any dust and stray finger prints from the clay.
Then it’s time to bake! Each piece, whether it be jewelry or a sculpture, needs to bake in the oven at 260 degrees in order for it to harden. The amount of time required in the oven depends on the size of the piece. The general rule is 15min per 1/4in of clay, but I usually keep mine in there longer. The longer the clay is in the oven, the stronger the finished piece will be. I really tend to baby-sit the oven toward the end to make sure nothing burns. Burnt polymer clay is no fun, especially after spending so much time creating a project — yes, it has happened to me before. *sniffles*
Once the piece cools I can buff out any rough areas and/or finger prints I may have missed before putting it in the oven. Sometimes I also paint on some small final details. After all that has been done I can glaze the piece to give it a nice shine. I glaze most pieces, but not all. Some look better with a matte finish when trying to go for a certain look. Often times I just do a bit of ‘spot glazing’ for things such as eyes.
BW: Though I imagine it varies, how long do you typically spend on making a finished figurine?
E: If you read through the answer above, you can see that there are a lot of steps involved in making any piece. All of these steps take time, but it really does vary, especially depending on the size of the project and amount of detail going into a piece and whether or not it needs to be painted.
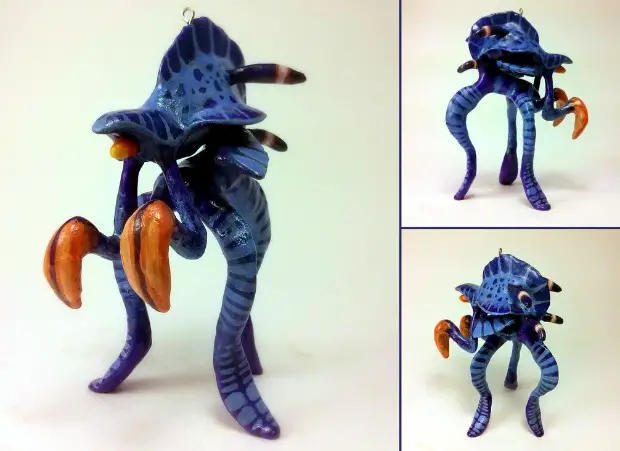
For example, one of the more time consuming pieces I’ve done recently was a 4” high custom Christmas ornament based on a blue fen strider. The armature alone probably took me over an hour to get right (and that isn’t taking prep time into account). Sculpting the body took a good two to three hours, and then painting the details & glazing took at least another hour. Smaller sculptures in the 2” range usually don’t take as long because the armature isn’t nearly as complex, but they can still take far longer than people may realize if the piece is fairly detailed.
BW: How large are your typical pieces? They look pretty small — why work on such a small scale? Does crafting small pose any particular challenges?
E: My sculptures are usually anywhere from about 2 – 5” high. I make my pieces small for several reasons. First and foremost, the smaller the piece, the less crazy I have to go with building an armature on the inside. Some of my smallest projects were so small that I could even forego the need for one altogether. The need for a very complex armature adds a lot of extra time to a project. Another reason for the small scale is because it makes sending them through the mail far less of a headache.
The hardest part about crafting on such a small scale is that sometimes I just can’t fit in as much detail as I’d like. I mean literally can’t fit in. My fingers are just too big and clumsy for what I’m trying to do, and even my smallest tools can’t help me in some areas.
BW: What are you working on right now (or next)?
E: I am actually between projects right now. The last one that I just finished was a custom Night Elf Druid in bear form. That particular piece was a lot of fun to make and I’ll be excited to show pictures of how it came out with the community after it reaches its final recipient.
The next piece that I’ll be starting on shortly is a custom Dreadsteed. It will probably end up looking similar in size and style to the Headless Horseman’s mount that I created a few months back.
I’ve got a couple more custom projects after that, and then I’m hoping to create a few more Pepe necklaces before the newest addition to my family arrives in April.
Please consider supporting our Patreon!
Join the Discussion
Blizzard Watch is a safe space for all readers. By leaving comments on this site you agree to follow our commenting and community guidelines.
