5 awesome cards to use at Marvel SNAP’s Featured Location, Rickety Bridge
The next Featured Location in Marvel SNAP’s The Savage Land season is Rickety Bridge. Featured Locations, for those unaware, typically change over on Tuesdays and make a specific location more likely to appear. They are usually worth some deck adjustments if you’re looking to win some matches.
Let’s take a look at some great cards to use while Rickety Bridge is the Featured Location, though all of these cards will work to your benefit whenever you encounter the Rickety Bridge Location in the future.
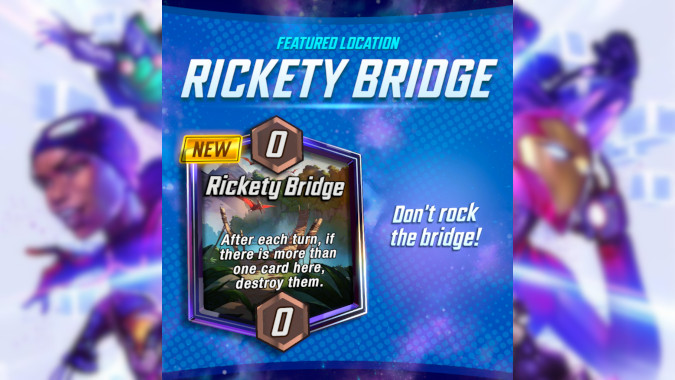
What is the Rickety Bridge? What’s the key to winning when the Rickety Bridge is up?
Somewhere in the Savage Lands, probably in the Eternity Range, there’s a rickety bridge. Maybe more than one. As Locations go, it’s not exactly iconic. I mean, it’s a bridge, but it’s kind of rickety. You should probably walk single file when you cross it. If you have too many people on this rickety old bridge, it might collapse, and everyone would plummet to their doom.
In Marvel SNAP, the card translates this idea by only allowing one card at the location. As soon as there are two (or more) cards at the Location, they all get destroyed. The count is for all cards, your’s and your opponent’s. If you both have a single card at the Location, (check my math here, but one plus one still equals two), they both get to appreciate the “gravity” of the situation and get destroyed.
There’s no cheating this Location with Brood (On Reveal: Add 2 Broodlings to this location with the same Power) or Mister Sinister (On Reveal: Add a Sinister Clone to this location with the same Power). Nope. Those Broodlings and Sinister Clones are falling to their doom as well.
Great cards to use on Rickety Bridge
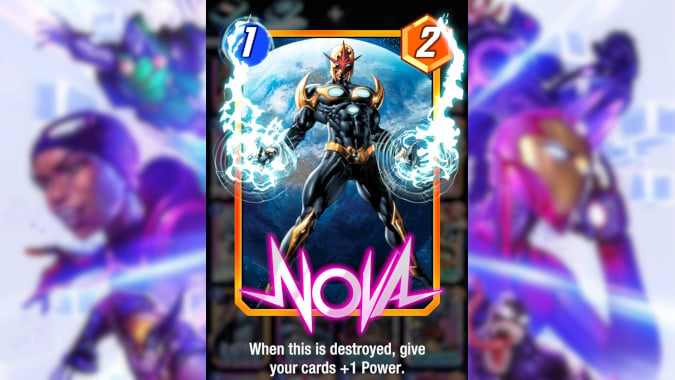
Nova
All your normal Destroy package cards work well at this Location. Nova buffs your other cards. The Hood (On Reveal: Add a Demon to your hand) gets rid of the -1 Power card, but still give you the 1-Energy, 6-Power Demon token. Deadpool (When this is destroyed, return it to your hand with double the Power) can get destroyed over and over, doubling his power each time. Death (Costs 1 less for each card destroyed this game) gets her Energy cost discount for every card destroyed including your opponent’s. Knull (Ongoing: Has the combined Power of all cards destroyed this game), if you are fortunate enough to have the super rare Series 5 card, gets buffed from every card destroyed.
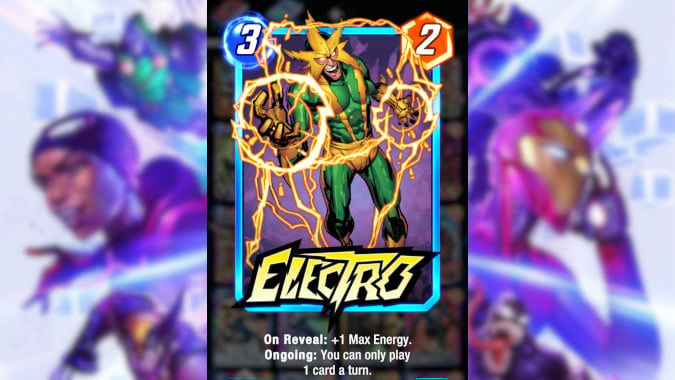
Electro
Locations like Rickety Bridge are great for getting rid of a negative side effect of a card like the aforementioned The Hood, and Electro. You still keep the +1 Max Energy, but his negative Ongoing goes away when he falls off the bridge.
This same kind of effect also helps you with cards like Bast (On Reveal: Set the Power of all cards in your hand to 3) or Psylocke (On Reveal: Next turn, you get +1 Energy). While not normally thought of as cards with negative side effects, they do have understatted Power. Using them at Rickety Bridge allows you to take advantage of their awesome On Reveal effect and not have to worry about the low Power card taking up a precious card slot on the board.
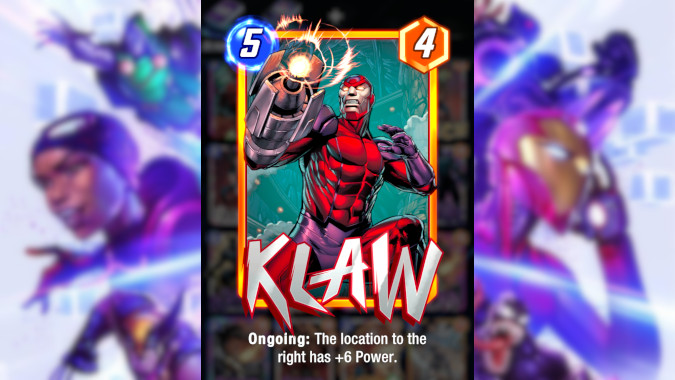
Klaw
One of the major challenges of Rickety Bridge is getting some Power into the lane in order to secure it. One of the best solutions is to use a card like Klaw which can give you Power in a Location from another lane. As long as Rickety Bridge isn’t the far left Location, you should be in great shape.
Mister Fantastic (Ongoing: Adjacent locations have +2 Power) and Omega Red (Ongoing: If you’re ahead by 10 Power here, +4 Power to other locations) can do something similar. But Mister Fantastic’s 2-Power may not be enough to secure the Location. Even paired with Onslaught (Ongoing: Double your other Ongoing effects at this location), it’s still only 4-Power. Likewise, Omega Red has a fairly difficult to achieve condition.
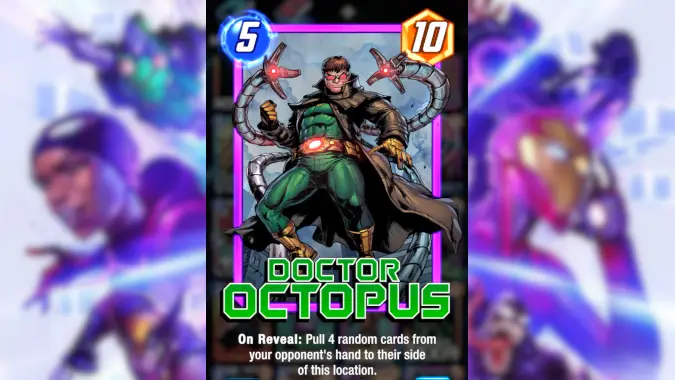
Doctor Octopus
The strategy behind playing Doc Ock at Rickety Bridge is to sacrifice your card to destroy four cards in your opponent’s hand. The hope is they lose so many key resources that they can’t compete with you at the other two Locations. You’ve also likely ruined whatever end game plan they had in mind. Like most Doc Ock plays, it’s inherently risky, but the payoff could be huge.
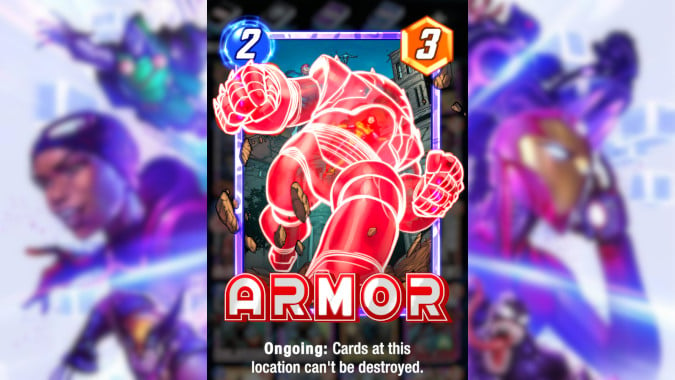
Armor
As has been the case with several of these destroy type of Locations (Altar of Death, Morag, Vormir, etc.), Armor allows you to simply ignore Rickety Bridge. Play all the cards you want. You just have to be wary of your opponent playing an Enchantress to negate Armor’s effect.
You could also try transforming the Location with Storm (On Reveal: Flood this location. Next turn is the last turn cards can be played here), Majik (You can’t play this on turn 6. On Reveal: Change this location to ‘Limbo’), Scarlet Witch (On Reveal: Replace this location with a random new one), or The Reality Stone (On Reveal: Transform this location into a new one. Draw a card).
What are your ideas?
Even though Rickety Bridge isn’t the most iconic of Locations, it provides some opportunities for creative problem solving. Whether it is in your Location pool due to the event, or just one of the randomly chosen ones after the event, hopefully these cards and tips help you win!
Keep in mind that even as the Featured Location, there will still be matches that you don’t see Rickety Bridge. Make sure your deck is flexible enough that you don’t have to retreat if you don’t get Rickety Bridge in your Location pool.
What other great cards have you used with Rickety Bridge? Let us know in the comments.
Please consider supporting our Patreon!
Join the Discussion
Blizzard Watch is a safe space for all readers. By leaving comments on this site you agree to follow our commenting and community guidelines.


