Mythic+ dungeon cheat sheet: keystones, affixes, and how to deal with them
Mythic+ dungeons in World of Warcraft are a great way to challenge your group or get some of the best gear available. Their difficulty comes from a rotating set of extra affixes that add complications to the dungeons you visit. Each week there’ll be up to 4 affixes depending on how difficult of a level you’re attempting. At +2 you’ll have only one affix, but when you get up to +10 all four will be active. Each week the active affixes will change. This helps to keep the experience fresh, while also making it easier to plan your runs for the week. If you want to know what affixes are active right now, the website Mythicpl.us will tell you — as well as what new modifiers you can look forward to over the next two weeks!
In Battle for Azeroth, every Mythic+ will have either Tyrannical or Fortified, making either the trash or bosses tougher for that week. Of the two Fortified is a little easier to deal with, since even if you wipe on a group of trash you’ll likely have killed at least one, making the pack easier for the next time you attempt it.
- Fortified: Every non-boss enemy in the dungeon will have more health and damage. Make sure that you don’t get too aggressive with your pulls and you should be fine. Make sure to keep a closer eye on your tank for the big pulls, and maybe consider using some crowd control if you’re worried. As a tank, you should be a little more liberal with your cooldown usage.
- Tyrannical: Bosses will take extra time to down, which means you get to really see their mechanics. If you can dodge or interrupt something the boss is doing make sure you do so. Getting hit can often be fatal, especially at higher keys. Plan your Bloodlusts so they’re available for the harder bosses in the dungeon.
Affixes you can get at +4
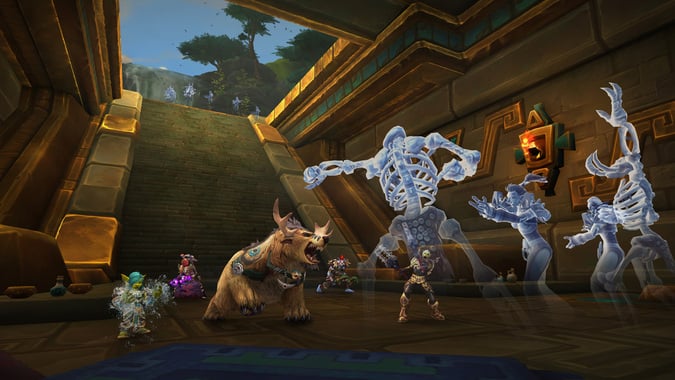
Once you’ve pushed your key up to level 4, you’ll start getting one of these five extra affixes. These only really affect the non-boss enemies in the dungeon. Although, you can bolster a boss if you kill any trash during his fight, so be careful for that. Bolstering, Sanguine, and Bursting have all recently been changed to not trigger off of trivial enemies. Which’ll make the Shrine of Storms dungeon way easier now that you don’t have to worry about making one of the Droplets into an unstoppable waterfall of destruction.
- Teeming: There’s extra trash sprinkled throughout the dungeon. You should be careful to check the groups before you pull them for an extra healer or high danger target that might’ve been snuck in. Don’t be afraid to use CC to keep something locked down while you deal with their friends. Routes you’ve taken to avoid some pulls might not be possible if there’s an extra body closer to the edge.
- Raging: This isn’t so hard to deal with. There are classes who have ways to clear the enrage, like Soothe from Druids. If you’re fighting something that does large area damage or cleaves, try and get them to cast it just before pushing them below 30% to give you the most time possible before they do it again.
- Bolstering: Try and work groups of enemies down at the same time. Spread your damage so that when something gets Bolstered you only have to deal with the extra damage for a little while. Remember that any trash brought onto bosses will bolster them, but any extra things created by the boss won’t. So you don’t have to worry about Raal the Gluttonous getting gigantic if you kill all of the oozes he coughs up.
- Sanguine: Don’t stand in the blood. Watch out for the positioning with this one. Someone could walk a little further around the puddle left behind and accidentally body pulls a group you normally skip. If you have spells like Typhoon or Death Grip to move enemies out of the puddle, this is the week to use them.
- Bursting: This is the most deadly of this batch. As a healer, you’ll have to be ready to stabilize the group after they finish. If everything goes well, you won’t have killed everything at the same time. Three stacks of the debuff are manageable, four might require healer cooldowns. If you get more than that, immunities and major survival cooldowns should be used.
Affixes you can get at +7
While these affixes aren’t cakewalks, their difficulty comes from having the other two modifiers in place already. Necrotic gets a lot scarier when there are extra enemies from Teeming present. Grevious doesn’t play nicely with Bursting or Sanguine at all and especially can be a headache with Tyrannical active. When everything that the boss does hits harder, it’s a lot easier for the whole group to get low.
- Necrotic: Tanks, this is going to hurt. Each stack reduces outside healing done to you, and there will come a point where you just cannot be healed at all. So you better be ready to kite as if your life depends on it — because it does. If you can get the group to help with stuns, snares, and knockbacks you’ll have an easier time.
- Grievous: Falling below 90% health isn’t deadly normally, but on grievous weeks it easily can be. Try and take talents that help you heal yourself, as healers will be kept extremely busy. Try and prioritize people with the higher stacks first, and tanks can usually fend for themselves for a little while.
- Skittish: Tanks should try and coordinate which enemy they’re attacking first. If you’ve got a Mage who uses all of their cooldowns on a target you’re not paying attention to, it might just decide that the Mage is a better target and go eat them. Tricks of the Trade or Misdirection can help to lessen the impact of this but aren’t necessary. When you’re fighting a single target try and work Taunt into your rotation, just in case.
- Quaking: This will test your group’s ability to spread out. The damage from three overlapping quakes can be quite painful. If you’re a spellcaster you’ll have to make sure you don’t get interrupted by it either. This is by far the most annoying affix, it will happen whether you’re in combat or not — and has a tendency to happen just before you’ve gotten your food buff.
- Volcanic: This will prioritize targets at range, but still pop up under the feet of melee and tanks if nobody is out there. Make sure that as you’re dodging you don’t accidentally pull extra enemies, or move into someone else’s volcano. The more targets that are alive the more volcanos will spawn so the week it overlaps with Teeming is extra exciting. Unlike quaking, this only happens in combat.
- Explosive: Having one explosive orb go off is bad, having two go off is worse, and three will probably kill everyone except for the tank. It’s everyone’s job to target and kill these floating orbs as soon as you see one spawn. These won’t be hit by area of effect spells, so you’ll have to swap fast. Like Volcanic, the more things you’re in combat with, the more explosive orbs can pop up.

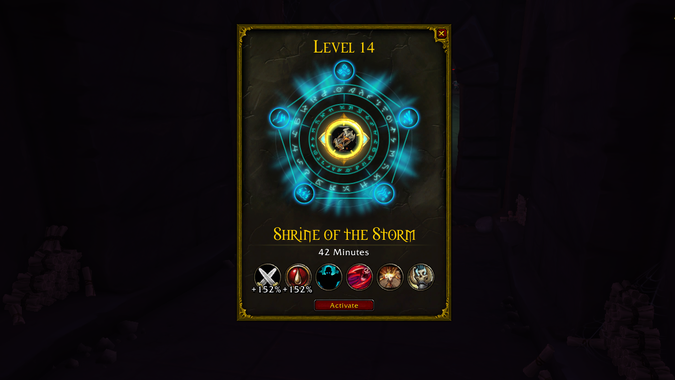
The Seasonal Affix
When you get to +10 you get a new seasonal affix. As each new raid tier opens, this will change to be something that’s themed to match the raid. During Uldir we had Infested, which caused worms to burst from enemies who were tainted with G’huun’s power. It’s a great way to keep the system fresh and provide new challenges to people tackling the toughest difficulty Mythic+. With the Battle of Dazar’alor in full swing, Bwonsamdi has decided to get in on the fun with Reaping.
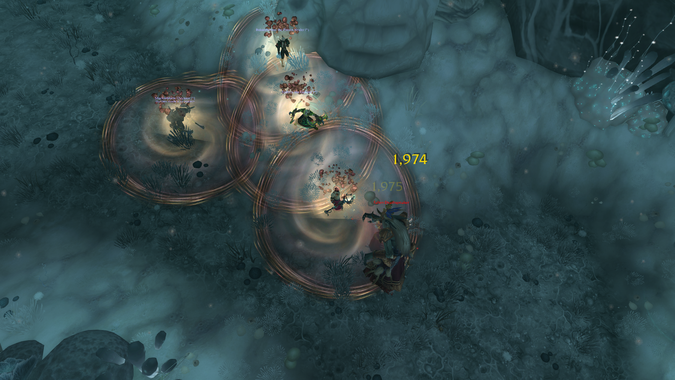
- Reaping: Everything you kill leaves behind a ghost of itself. Every 20% of the trash you kill, all the ghosts come to unlife and swarm the group. They come in three flavors, which can seem daunting at first, but you’ll quickly get the hang of things. Lost Souls are the largest, they’ll use a slam attack and explode in a series of death bolts when killed. Getting hit by either of these attacks will leave you with some nasty debuffs so make sure you dodge. Tormented Souls will only attempt to cast Grave Bolt which does a large amount of damage. Interrupt and Stun them whenever possible. The Risen Souls are the easiest to deal with, they’ll melee anyone who has aggro on them which applies a debuff called Reap Soul. Healers need to cleanse this off of the tank when the stacks get too high.
The easiest way to deal with Reaping is to make sure you have crowd control and burst damage ready for them to spawn. Make sure that you pay attention to the percent so that you don’t accidentally get reaping at a bad time. Balance Druids can use their Treants and Shaman can use Earth Elemental to help tank the ghosts, which makes fighting them drastically easier on the tank and healer. If you can manage to kill the final boss of the dungeon before hitting 100% enemy forces killed, you’ll be able to avoid getting the last wave of ghosts altogether. The best part of Reaping is that if you don’t make the timer in your dungeon, you can ask Bwonsamdi for a buff. He’ll give you an extra 20% damage and healing for the rest of your run, which could give you the extra oomph you need to get through the last boss.
My biggest piece of advice is to stay calm and go at a pace you’re comfortable with. I know that the ticking clock can make you seem like you have to rush and take risks, but taking an extra second or two between pulls to allow your healer to rest and get mana is always a good idea. Mythic Dungeons can be a lot of fun. Hopefully, this helps you get a handle on what you can expect from week to week.
Please consider supporting our Patreon!
Join the Discussion
Blizzard Watch is a safe space for all readers. By leaving comments on this site you agree to follow our commenting and community guidelines.


