Demon Hunters getting you down in Hearthstone? Try this Galakrond Warlock deck!
So you’ve been trying to earn some ranks under the revamped ranked system in Hearthstone’s newly released Ashes of Outland expansion, but those pesky Demon Hunters are everywhere, and they’re absolutely ruining your day? Well, fret not, my dear reader, for I will now tell you who hunts the (demon) hunters!
Spoiler alert: it’s Warlocks.
Introducing the Galakrond Warlock deck
- Total cost: 9,120 dust
- Deck code: AAECAf0GBsUE/KMD068DkbED47QD8b8DDKMBigfECJ2pA+WsA+isA+qsA+usA+ysA/6uA6qvA/2wAwA=
- Deck link
- Legendaries:
Card replacements
The only legendary that is truly necessary is Galakrond. The other four are the main tools you’ll use besides him to secure a victory — you’re best served if you have all of them, but if some are missing, you could try to fit one of these replacements. Most are aimed towards giving you even more control to help you survive until you get the tools that you do have:

How to play your Galakrond Warlock deck
This Galakrond Warlock deck should be played as a Control deck — for the most part. During the initial phases of the game, you’ll probably be taking some damage and not dealing much damage to the opponent yourself. Ideally, you’ll switch gears into aggressive later, as your big tools arrive.
But this is not fully a Control deck. Against certain opponents, like Priest, you’ll probably be attacking them more than they’re attacking you. In those cases, make sure to remain aggressive and save your best minions to be played as late as possible. Let the enemy spend their valuable resources on your weaker minions first!
The early game
Make deliberate use of low-cost spells and rush minions to control the board as much as you can. For that purpose, these tools are your friends:
- Mortal Coil to finish off minions and draw cards.
- Devoted Maniac to net you favorable trades and help you keep control of the board.
- Dark Skies (more on it below).
- Nether Breath — but consider ensuring that it hits for four damage and heals you.
Fiendish Rites should be used mostly to invoke Galakrond, but don’t forget that the extra attack on your minions can be the decisive factor in allowing you to deal with a strong opposing board.
An early Bad Luck Albatross spells good luck to you. It usually trades favorably, and disrupts draw-heavy decks and Highlander decks.
Controlling the board
Shield of Galakrond can buy you some time, but it’s not a tool you should rely on. A Taunt minion won’t make you “safe” — your opponents will have many tools at their disposal to deal with it. You should look at it as a minion that will give you a trade (or make your opponent spend a resource), and Invoke.
Dark Skies is reliable, since most Warlocks have their hands full of cards most of the time. Make sure you trade off your minions first, and then cast the spell.
Plague of Flames is superb. Since this deck summons many small imps whenever you Invoke, chances are you can find a way to summon as many minions as your opponent has and then destroy them all. Save this card for late game, if possible. Destroying something like an 8/8 dragon by sacrificing your 1/1 imp is glorious, and can cost your opponent the game. But don’t be too frugal with it — if your opponent is being too aggressive, it’s better to spend a Plague of Flames and rely on your other tools to deal with future threats.
Transitioning into the late game
The amount of card draw in this deck is absurd, and you ought to make the most of it, ensuring that you’ll get your Galakrond and cast it fully invoked.
Beyond your hero power, which you should certainly use in the early game, Veiled Worshipper is your main drawing tool. It allows you to draw three cards if you’ve invoked twice — not very difficult to achieve. Just make sure that you won’t overdraw, or that you won’t be left with ten cards in hand and no usable cards on that turn.
Don’t focus too much on drawing if your board position isn’t good. Your top priority is controlling the battlefield, and staying alive. Drawing cards in hopes of finding an answer is a gamble. It’s usually better to play it safe and deal with your opponent with whatever tools you have at the moment, and then worry about drawing more.
Key cards for this Galakrond Warlock deck
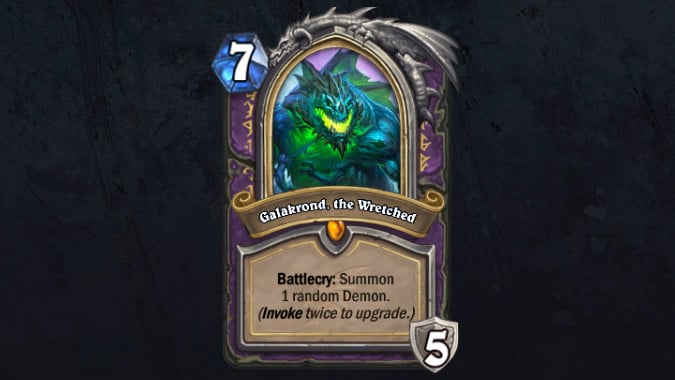
Galakrond
A fully invoked Galakrond gives you a nice 5/2 claw and summons four random demons. It should be noted: with Ashes of Outland, the random demons that come from this are often Dormant, so don’t expect them to necessarily make immediate impact on the board.
Don’t be afraid to use your weapon. Your health is also a resource, especially since you have tools to heal yourself. On mirror matches, I’ve used my Acidic Swamp Ooze to destroy my opponent’s claw before they made a single swing with it — something that turned the tides decisively in my favor.
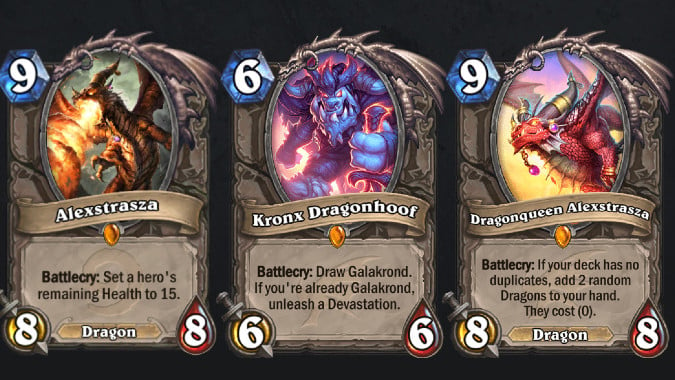
Kronx Dragonhoof
How you use Kronx depends on the situation. Avoid using him to draw Galakrond — try to cast him when you can benefit from his Devastation.
Which Devastation to use? It depends on the situation. Most of the time, I pick the “damage to the opponent + heal” option, because I’m looking at finishing the game and/or surviving. But using the board clear option is not uncommon, and even the big taunt can be useful on certain occasions. Using it to give +2/+2 to your other minions is a little less common.
Alexstrasza
Alexstrasza usually dictates the moment when you want to switch from controlling the game to finishing off your opponent. Up until then, you probably haven’t attacked your opponent’s face much, if at all.
If you have to use her to heal yourself, chances are things are going downhill for you; but some games are still winnable even at that point — this deck has other powerful endgame tools, such as…
The other Alexstrasza
Dragonqueen Alexstrasza should only be played once it has a golden glow, indicating that there are no longer any duplicates in your deck.
Most dragons will have heavy impact immediately. Sometimes you’ll get a heal. Sometimes you’ll get a second Alex (of either kind). Sometimes you’ll get something that your opponent simply wants to remove immediately, like an Ysera. Don’t be afraid to use this as soon as you can.
Zephrys the Great
Just like with Dragonqueen Alexstrasza, wait until it can be activated. It’s not usually a problem on this particular deck, since it has so much card draw.
The effects I most commonly try to get from Zephrys are:
- Twisting Nether on 8 mana to deal with an enemy board.
- Bloodlust on 5 mana if that will be enough for me to finish my enemy off immediately.
Sacrificial Pact
This card is the MVP. You’ll love it and cherish it. You’ll make Illidan himself shudder and maybe even cry a little.
If you’re not fighting against someone who uses demons (Demon Hunters and Warlocks, mostly), this will probably be used to heal yourself by destroying one of your imps. It’s not a bad use, all things considered, especially against aggressive decks. But if you can save it to take out an enemy demon… the tides can really turn in your favor.
You should consider using Sacrificial Pact against:
- Battlefiend if there’s the risk that it will grow out of control
- Priestess of Fury
UPDATE: since the nerf, Sacrificial Pact is no longer the MVP. It can only be used to heal yourself now.
Have fun! And don’t let Illidan ever tell you you’re “not prepared.” Not anymore!
Please consider supporting our Patreon!
Join the Discussion
Blizzard Watch is a safe space for all readers. By leaving comments on this site you agree to follow our commenting and community guidelines.


